April 3, 2013

Masamune arm guards pt.1

I've been working on the arm guards for Masamune the last few days and figured I could write a progress post now that I'm about half-way into the process. So well, back on last Monday (1st April) I cut out the pieces for the arm guards from craft foam, namely two "bottom" and two "top" parts.

One of the "bottom" parts cut out
With all the needed parts cut out I asked Jäätynyt Enkeli to come help me with the heat forming because hey, two pairs of arms are always better than one. So we went outside and one of us held the craft foam piece in its wanted form while the other one used the heat gun to form it. The first piece we finished looked like this after the heat treatment:

Tadaah ~
And this is what I had after we were done forming them:

Dem shapes ~
I must say craft foam, at least in my case, doesn't hold the shape really well.. it keeps the shape semi-well but I noticed it straightened itself out with time.. at least mine did. *shrugs* Oh well. I didn't do any more progress on Monday.

Yesterday (2nd April) I decided to try using fabric backing for the first time as a way to stiffen, strengthen and support the armor. So I went into the attic to check what fabrics we had that could possibly work; I wanted something smooth, something light-weight that had a bit of stretch. After looking around I found this one very dark blue very soft and nicely flowing knit-like fabric that seemed pretty cool. I took it with me back inside and cut out fitting pieces for the armors, making sure to have some excess just in case.

Fabric backing cut out
I then just took the craft foam armor pieces and glued the fabric on the side that would be against my body, obviously. I used your standard white universal glue and, in my case, that was Erikeeper. I just took a pencil and brushed glue all over the foam and then put the fabric on and pressed it and let it dry. I used a little bit too much glue on the first try because when I was applying pressure the glue "leaked" over the fabric. Well, now when I think about it it's not weird that it did.. the fabric is knit-like after all.. aka small holes. -.- Oh well, it made no difference so no harm done.

Fabric glued to the back side of the craft foam
I did this same thing for all the pieces and after they had dried completely I trimmed the excess fabric away.

Fabric backing to the right
Next step was to seal the craft foam. This step is optional (as well as fabric backing) but I always do it because otherwise you will be spending more paint on the foam because.. well, it's a bit like a sponge or something so it sucks in color a lot. It's better to just seal it because if you do you will get away with fewer coats of paint and posssibly a nicer result as well. Not to mention sealing the craft foam seems to give it a bit more strength too. I use a glue & water mix, aka diluted glue. I just use a normal white glue (Erikeeper, again) and mix it with some water until it's watery enough not to leave any pencil strokes when you brush it on.

Water & glue mix ready to be brushed on
And here's the foam pieces after their first coating, still wet
(you can notice at this point the pieces have lost pretty much all of their curving...)
And the remaining part of yesterday I applied shitlots of coatings; every time the earlier one had dried I put a new one. I think I coated them around 10 times, I'm not so sure, I didn't count. Today I put on a few more glue coats on the morning and then waited until stepdad got back home from a trip to town; he bought me some black spray paint, like I had asked yesterday.

The spray paint in question
I went outside and made a makeshift working table out of small wooden steps and cardboard. I put the foam armor pieces on top of the cardboard.

My makeshift working table ~
I then took the spray paint and shook it for some minutes before I sprayed away.

First coating...
Okaaay... my first reaction was something along the lines of "Oh god why didn't I use a black/white primer?" It's easy to be wise after the event.
I must say the first coating made me scared because the foam didn't seem to take the paint well at all and all sorts of "oh fuck don't tell me it won't work" thoughts appeared in my mind. I then thought that maybe I diluted the glue too much and/or didn't use enough coatings. I don't know, but I got nervous and waited a bit before I tried spraying on a second coating. 

Second coating...
The foam pieces seemed to take in the second coating better but the bright colors still shone through when you looked at them from certain angles and my hopes about this working as well as it had done with earlier projects sunk pretty low. When I looked at them my expression was like:


But I decided to let them dry outside for a while and came back an hour or so later to check. I was not surprised to find out they hadn't completely dried yet...  stupid 0 °C weather, takes forever to dry! Oh well, I decided to spray on a third coating just in case to see if they would turn fully black now.. if not I could just paint them over with an ordinary black paint and then try spray painting on top of that.


Third coating
Okay, my hopes for these arm guards are slowly recovering! I'm not so sure how they will look when dry but at least now the original color doesn't shine through much at all. Currently the pieces are in the sauna drying (mind you, sauna is power off xD) because at this moment it's about to get dark outside and the paint really doesn't dry well in the cold. Oh well, tomorrow I'll see how they have dried. Hopefully the paint will still flex with the foam when dry, it seemed to bend just well without cracking while I tried bending them when they weren't completely dry. Here's to hoping.

More progress later.

March 31, 2013

Masamune armor patterns + Craft foam heat forming test!

Back on last Friday I started drawing the patterns for Masamune's leg armor and arm guards. Basically I just looked at some references, took measurements and improvised.

Just one of my many Masamune references
After I had made a pattern I tried it around my leg/arm to check if it fit like I wanted and so on. Here's some pattern photos:

Started drawing the first pattern (leg armor)
To make sure that my patterns were symmetrical I drew one side, cut out half of it, folded it over and traced it to make the other half identical.
Leg armor pattern (front curves at top, back doesn't, hence the lines) with knee cap
Top arm guard pattern
I had to redo the lower arm guard pattern a few times because I noticed that the arm guards won't lay like straight on "top" and "bottom" of your arm.. they'd be angled a bit diagonally or eh, so that the spike of the top arm guard is turned more towards your elbow. If that makes sense.

Original pattern wasn't wide enough at top so I widened it..
Then I noticed it was maybe a bit too wide so I made secondary unfilled lines just in case...
.. but I ended up cutting them off and modifying the pattern a third time.
The final pattern is the one with the red marker on top of it.
Okay, enough of patterns. Yesterday I went to town to buy some craft foam for the project and the more I thought about it the more I felt like I wanted to make the arm guards out of craft foam instead of the polystyrene sheet.

Craft foam sheets!
(well, they are pretty bright colored but you can paint over them so it doesn't matter..)
Today I then traced the top arm guard pattern on a sheet of craft foam and cut it out.

After tracing
I didn't cut out more than one piece because I wasn't sure how to go about forming it.. or well, more like I've never done it before. I knew it was possible to form craft foam into different shapes with a heat source, like a stove burner or heat gun for example. The stove burner option wouldn't work at my home and I wasn't sure a hairdryer would do the trick so I asked stepdad if he happened to have a heat gun... and he did! Wohooo!

I took a few earlier scrap pieces of craft foam and went outside to try heat forming the foam into a new shape.

Heat gun, gloves for protection and a few scrap pieces
There was a metal rod protruding from that working table I used.. so I decided to use it as a form to test shaping the craft foam on. I just put on the gloves, rolled the craft foam piece around the rod and kept it in place with my hand while I applied heat. When it seemed like the craft foam started to get soft/floppy I turned off the heat gun and kept the foam in its new shape until it cooled down.. and this was the result:

It works! :DD
A few more tries later I had this:

The one to the right is the first try, second in middle and last try to the left
(those cuts were there before, they are not cracks that happened during the heating)
I must say while I formed the last one my hand slipped from keeping it in place on the rod and so it got a slight mark from my hand because it hadn't cooled down enough to regain it's normal.. consistency. I need to be a bit more careful with the actual arm guards then so that their surface stays nice and even. Oh and yeah, I plan to make it tomorrow!

March 29, 2013

Masamune try-on, this is what I have so far!

Today I decided to put on everything I have ready, so far, of my Masamune cosplay.. just to see how it all fit together. All armor and weapons and some smaller details are missing.. like tabi socks. I haven't tried all the at-this-moment-ready parts on before so this was the first try! I'm surprised at how flattering this thing looks on me.. I was pretty sure I'd look horrid but glad to see I was proved wrong!

Here's some photos! Oh, and yeah, used a mirror for help so they're all mirrored.
Also I didn't find the eyepatch so excuse me Masamune regained his sight for a while lol.


Today I also started making the patterns for Masamune's leg armor and arm guards. But I noticed I don't have enough craft foam at home.. which I will need to make prototypes to check that the patterns are okay and maybe also use it for the actual armor. I will go to town tomorrow and buy some. More about the armormaking then! See you all!

March 24, 2013

One-eyed Dragon rubber pants

I've actually been working on the pants for Masamune since last Sunday but I'm going to post about it now that I'm finished instead of posting multiple short updates.

Okay, so on last Sunday (17th March) I decided on what pants pattern to use.. I had been very unsure about this for quite some time. I found an okay pattern at one of these sewing magazines mom occasionally buys. I just followed the instructions in the magazine and traced out the parts I needed from the pattern sheet.

So.. much.. patterns...
But I managed to find, trace and cut out what I needed
That Sunday I didn't do anything else. On last Tuesday (19th March) I wondered if I should do a prototype version.. you know, like a mock-up of cheap fabric to check that everything works before using the real fabric. But I didn't really feel like making a prototype so I just measured the patterns and compared them to myself and it seemed okay.

Yesterday I started the progress for real. First up was of course to put out the patterns and cut the fabric. I must say I had pretty much just enough fabric left for the pants.. the rest was used for the coat. Oh, and I saved all slightly bigger scrap pieces in case I can use them for Masamune's "wings" between his sword sheaths.. but more about that later.

Here's a few photos:

Patterns pinned in place..
... and cut out.
But while cutting I managed to prickle my hand on a pin and I didn't notice the blood until after I was done cutting.. at least I got nothing on the fabric, that would have been a bother..

Most common damage in this hobby I guess..? xD
With the front and back pieces cut out I went to start the sewing. This time I would use the overlock machine, it makes life a lot easier.. and quicker.

First thing to do was to take both front pieces, put them right sides against each other and sew them together at the.. err, crotch. xD I did the same to the back pieces of course.

While sewing..
Next step was to sew the outer seams closed. Nothing special.. I put the front and back pieces against each other, right sides together and sewed on the wrong side of the fabric.

Outer seam sewed... turns out one side has a slightly longer leg by the way
With the outer seams closed I could now go and try the pants on and see if I could even get them on because.. well, almost always when I sew something I worry I have underestimated my walrusness when measuring.


I must also mention that yesterday I wore kimono all day and well.. I didn't feel like changing just to check for a few seconds if the pants would fit...

Tsädää!
If they fit over a kimono at least they aren't too small! :DDD
Knowing the pants weren't too small I went ahead and closed the... err, inner seams and crotch area or whatever to call it.

After I had passed the crotch seam..
When I had finished sewing that part I checked that everything was alright and that the stitching had caught on both sides of the pants... which it hadn't.

Before
After
Next thing I did was that I evened out and hemmed the pant legs. The overlocking machine makes things easy because it cuts the fabric too so I didn't have to cut the excess length off myself.

Fixing a pant leg...
After that I had to add a strip of fabric to the top of the pants to keep them from falling off I moved around for a while. I had saved a bit of the fabric for this purpose back when I cut out the pants.

This was the piece that was left
(yes, I like me some Pepsi)
After I had trimmed it to a 13 cm width
After i had cut it shorter
With that done I went to sew the ends together so that I got a tube, like this:


Then I just folded it in half and put it on top of the pants upper edge, right sides together. I figured I wouldn't need to add an elastic into the "tube" because the fabric stretches a bit; instead I just cut it a bit shorter than the measure of the pant's circumference and stretched it to match with the pants while I sewed it on.

Oh well, when I was half-way with sewing the tube to the pants the overlocking machine decided to quit. Mom tried to check what was wrong with it but it just didn't want to cooperate anymore for Saturday, despite some tries to get it to sew normally.

Half finished waist-tube-thingy.. you can see to the left where it stopped sewing properly
I didn't work anymore for Saturday and so today (Sunday) I did the last fixes. I started by trying to get the overlock machine to work but it just kept doing bad stitches or no stitches at all. Mom came to help and re-thread the thing a few times until it finally worked again. I must say when I tried to re-thread it (first time ever) I noticed how this thing certainly wasn't made for left-handed people. Dx Oh well.. we got it to work so I finished sewing the rest of the tube on.

Finished waist tube thing..
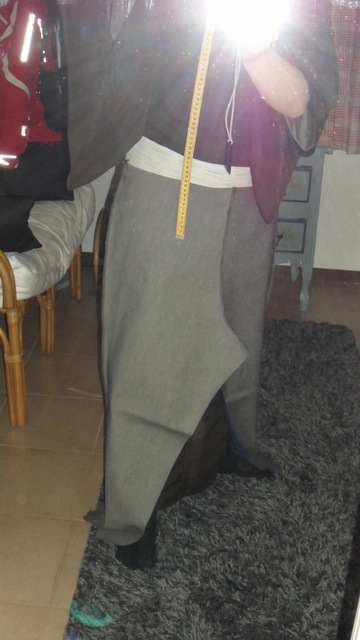
With only the pant legs to fold I went to try them on. I must say they are surprisingly okay to wear.. except that when I move they make this rubberish sound.. mom actually dubbed them "rubber pants". xD Oh well, here's a photo:


I just had one thing to do now.. fold and sew the pant legs. They were a bit too long so I folded them over twice to get them to a good length. Of course I used a normal sewing machine for this.. can't do a straight stitch with an overlock...

Folded and ready for sewing..
Finished!
And with that my pants for Masamune are done. Next time I'll either do some small stuff like the gloves/tabi or start with the armor making. We'll see.

See ya!

March 22, 2013

Desucon - When I thought I saw the goal line...

... I have to take a big step backwards.
Yeah, there is bad news.

I got a message at Aniki some hours ago from the carpool contact person.. seems their plans changed so I'm back to the point without a ride; without a way of getting to Desucon. Damn, that joy was short-lived..


Oh well, I'm determined to go to Desucon so I'm again looking for a carpool possibility at Aniki forums as well as here on my blog. If anyone traveling to Desucon from Kemi/Tornio/Oulu/somewhere-close-to-these sees this and wants to help a fellow congoer out please do get in touch with me! My email is to be found at the left side of the blog but you can also comment on this post.

Until then I'll sit here biting my nails and hope for the best...

March 21, 2013

Con roll ticket blast!

Today I've been grabbing myself tickets to two anime conventions in Sweden that I will attend in July! Why? Because it's better to be early than too late and because JAG ÄR SÅ JÄVLA PEPP!! <3 Yeah, there's Desucon coming first but I'm still pepp for these!

The first con is...
*badumtsh*
Närcon!

Närcon had a "pre-order advantage" for those who answered their earlier attendant feedback enquiry or bought tickets to Närcon Vinter before the "Conbopaket" was released... I think. Whatever it was I was one of the people who had the privilege so that I could order the Närcon tickets already today (21st March) during the pre-release instead of having to wait until the real date - 27th March. I had gotten a personal once-only code that let me order stuff for Närcon, from tickets to Närcon t-shirts before the real date. Of course I bought myself a con ticket only a few hours after the pre-release (aka as soon as I got home from school) just to be on the safe side. I snagged myself one of the 100 SEK cheaper limited supply Early Bird tickets! They only cost 250 SEK when ordinary ticket price is 350 SEK.

And the second con is...
*badamtsh*
Skecon!

Not long after ordering the Närcon ticket I felt I could as well buy a Skecon ticket too while I was on the roll! Skecon had already released the tickets some time ago (400 pieces) but I hadn't instantly bought one because last year I don't think they sold out everything.. and they had 200 tickets back then. Oh well, Skecon has said this year it will be bigger and more awesome with artists and stuff. Also, last year's Skecon left a good impression on me and because I want to support con's in the north and it's a lot cheaper for me to travel there I really want to go this year too! I secured myself a Skecon ticket as well as bought one for my friend Sairu-chan!

 And here's my babies!


This also means that it's very unlikely I can go to Animecon in Kuopio, Finland, and that's because.. well.. if you look at the dates on the tickets you'll probably figure out why. If not, have this:

 5-7 July • Skecon 2013
13-14 July • Animecon 2013
25-28 July • Närcon 2013

Notice how they are all on the same month and how close Skecon and Animecon are? Skecon is one weekend and Animecon directly after on the next weekend.. and then a weekend with no con and then BOOM NÄRCON!!
With that said I don't think I really have the money to travel first to Skellefteå (which is chill distance) and then to Kuopio (not so chill distance) and then to Linköping (not chill distance). Too much for travel costs and it would feel a bit like "cake on top of cake", maybe too much of the good in such a short timespan? ^^" Err, so I think I will skip Animecon this time, even though I did enjoy it last year at Kuopio.. but unless a miracle happens aka if mom wants to go to Kuopio this year too (read: free travel) you won't see me there. :( Oh well, can't get everything in life ~