May 21, 2015

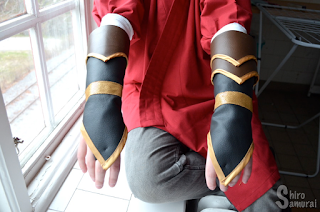
Making Kojirou's not-so-identical tekkou!

Hello everyone, how's it going? :)

During the final days of April I went to buy some fabric to make Kojirou's tekkou, aka hand guards. I had luck with me this time and Eurokangas had everything that I needed – black fake leather, dark brown fake leather and golden bias tape!

Fabrics!
Now you're probably thinking something along the lines of "what Kojirou?" and that's right, the name is a historical one and he was a famous swordsman living during the Sengoku and early Edo period; he was most known for having battled Musashi Miyamoto. 
Though the Kojirou I'm cosplaying is one from a visual novel and on this one he is a faithful bodyguard of Hana-hime, the main heroine.


I was studying my limited references and after staring at them long enough it became clear to me that his tekkou were slightly different on each arm, for some reason. At first I had thought that it was just inconsistent references being at it again (as always), but, after some closer inspection I did notice that they were indeed different. Wut.
Oh well ~

I jumped over to the textile/hand-working class in school to make these because hey, my apartment is way too small for a sewing machine... and I don't even have one anyway.
The first lesson I had at 29th April and what I did first was draft my base pattern with the help of a tekkou I already had saved me some trouble. I then did some modifications on the pattern and –when it seemed like it might even turn into something that works– I made a quick prototype out of fabric scraps to check the fit. It fit!
Sure that it was a bit loose but seeing how it will be made of fake leather (that doesn't stretch) and there will be a folded kimono sleeve and wrappings under, I, well, thought it better to make it a bit more roomy.
With the prototype working I cut out the parts from the black leather.. and that was when I noticed my first problem – I had miscalculated the width of the tekkou and thus I was a few centimeters short. Oh well, nothing much to do than cut it out anyway and pray that the few centimeters weren't a deal-breaker.

After having cut out the leather pieces I sewed on the golden bias tape around the edges. Of course this was a troublesome episode I had to rip up my stitches and redo three times, always because it didn't attach on the opposite side. Blargh! 
I have a love-hate relationship with bias tape...

Bias tape, I love sewing you so....... not.
One tekkou bias tape'd, other one still au natural.
Next I added the golden fake leather to make the thicker "rings" around the tekkou's upper half. After that I sewed one of the tekkou shut (aka so it takes the tube form) and then I proceeded to make the brown leather details that are on the lower half of his tekkou.


This is the best picture I found that shows what the hand guards
look like on the underside.
After looking at the references for a short moment I got an idea of how to do them. Let's start!


I started taking some measurements and then drafting out the design on the wrong side of the leather fabric. I then just cut them out and shortened each piece a bit because 35-36 cm in length was a bit too much. When doing the shortenings I accidentally cut one piece too short, or more like, each end wasn't even at one point, even though I swear to God I cut the same off on both sides! After a moment of "what the hell went wrong and where??" I noticed that it wasn't my fault – the person who sold me the fabric had cut horribly non-straight. Urgh. ._. Yep, so I had to redo one of the pieces (the thickest, aka solo one). 
I added bias tape to the needed areas again – this time it went smoothly!

A lot of bias tape sewing later I ended up realizing that I didn't have enough bias tape to finish my stuff – off we go back to the fabric store to buy 60 cm more!

In progress... and out of bias tape, fffuuu.
When I was done with sewing on the bias tape I did the "closing systems" on the underside of the tekkou... yeah, out of bias tape too. I folded it in half, sew a straight stitch on top and then just sew it on at each end; the other end by hand. Oh, and speaking of which, I sacrificed some accuracy on these because if I had put two closing ties on each piece (especially on the double smaller ones) it would have looked too crammed/busy and so on the double pieces I put one tie per piece, instead of two.
After that I did some "attachment spots" by hand-sewing on strategical places so that the brown details will stay on the main body of the tekkou and thus be less of a hassle to put on and wear.

Brown details completed, feat. "closing system" on the underside.
Example of hand-sewn stitch to keep the details in place, at all times.
With that done I was almost finished! The only thing left was to make the little loop for the middle finger (which I made out of some solid fabric scraps) and hand-sew it on. 

Finger loop done!
At this point I tried on the tekkou (it wasn't the first time) and for some reason it took me until now to realize that it was way too wide where my hand came out! Sure that I had made them bigger on purpose so that I can cram parts of the kimono sleeve –wrapped in bandages– under it, but still.
So what do I do? Take it in, of course! And of course because I did this by eye measurement (aka without measuring properly before) I ended up taking in too much at first and then I couldn't even get my hand through the opening... go me. ._. Luckily my oopsie run didn't leave too horrid holes in the leather, so I didn't ruin my almost-finished piece of work, phew.

Tekkou turned inside out, showing the original seam and the "take it in"-seam.
I repeated the process for the second tekkou and made sure not to accidentally sew a straight stitch on the brown detail parts (I had turned the whole thing inside out) because well, his tekkou are not identical and so the detail parts reach higher up on the other glove because there's two layers of them, overlapping slightly. I didn't want to do more silly mistakes and especially not because I had already stayed 30 min overtime in class and thus sacrificed half of my lunch break in school...

And now my tekkou are finished! o/


That's all for this post! Shiro Samurai out! :'D

May 18, 2015

[Sponsored] Lens review: Lenspop Bunny Color Brown

Hello! (。◕‿◕。)/

I'm writing today because I want to share another circle lens review with you all! o/ 
Yeah, I know, I've done quite a lot of lens reviews lately. OTL One of the main reasons for this is because while con season is about to start I haven't gotten my costumes ready to the point that I could post about them just yet (still waiting for some wigs and shoes to arrive etc). That's why I'm doing lens reviews so that this blog wouldn't be suffering from the dead blog syndrome, haha. Another reason is that, well, I'm sponsored nowadays by some circle lens stores so of course I will be chucking out reviews every now and then when I receive new lenses from the sponsors! ^.^ And also, I reaaaally love circle lenses and love reviewing them as well so yeah, my cosblog will in the future contain lens reviews more than it used to during the last year and before. I hope you don't mind too much, dear readers, ahaha ~
After all, cosplay and colored contacts do go hand in hand –at least according to meand I've talked about that before. ;)

  The pair of lenses up on the plate today are sponsored by Klenspop – a circle lens and beauty store that I will tell you a bit more about later, hang on!
The lenses I will be reviewing are called Lenspop Bunny Color Brown and yes, they are of Klenspop's own brand and seemingly popular for the moment hence why the store is promoting said lenses.

Even though the lenses were sponsored it doesn't change anything about my review I always only share 100% my honest opinion to all my readers and followers.


Base curve: 8.6 mm
Diameter: 14.0 mm
Water content: 38%
Life span: 1 year (I recommend 6 months)

Lenses in vials. Held up close to the window on a sunny day.


Before getting to review the lenses I first want to pop out a few words about Klenspop's store!
You see, they actually contacted me asking if I was interested in a sponsorship offer. At first I was quite surprised because I had recently gotten my first sponsor and yeah, I just hadn't expected a second one in such a short time frame! But after having taken a look at their site I remembered that "hey, I've seen this store before!" and then I recalled having seen another blogger do a review for Klenspop a long time ago. I also remembered the review being a positive one so despite my first impression of the store looking a bit unprofessional I thought that I'd take the opportunity!
I also googled for reviews on the Bunny Color Brown lenses and up came plenty – and all good ones! Besides, I had been wanting more natural-looking lenses for a while anyway. :')

About the store itself they carry mostly circle lenses (brown and gray, especially) but also cosmetics – eyeshadow, eyeliner, lip gloss etc. The prices are cheaper than on your average circle lens store, so it's quite affordable if you don't have the dough to spend but still want to be pretty-on-a-budget.
Just remember to always be careful with circle lenses, no matter where you buy them from. If your lenses ever feel bad, hurt or make your eye bloodshot etc then don't wear them!! Your eyes are a priceless and irreplaceable part of you while a pair of colored contact lenses only costs you an average 20 dollars. Remember to treasure your eyes – the gift of sight is not something to be reckless with!


The lenses came packaged in a cardboard box; Klenspop sends their shipments from Korea!
Inside the cardboard box the lenses were safely inside their own separate little box yo dawg, wrapped around a shitlot of bubble wrap – having the lenses come in a box doesn't happen everyday! I only ever had my orders from HoneyColor arriving in a box before this! Most times circle lenses arrive wrapped in foam so the box was a nice little surprise that made the order feel a bit more personal somehow, haha.
Inside the box the lenses were in their own plastic thingy and with them came a lens case and tweezers. 

The box (empty) and what was inside it.
I put the lenses to soak already a few days ago buuuuut the weather decided to be a douche and be gray, moist and rainy several days in a row. UGH. Yes, that's the reason why this post has been delayed for about a week; friggin' weather. OTL Well at least my lenses got plenty of time to swim in the solution lol...
Oh well, today when I woke up I finally saw some rays of sunshine coming into my apartment when I woke up – now was the time. 

When I first took out the lenses from the lens cases I noticed that they were quite thin – not exactly flimsy but possibly thinner than average. Maybe that is why I had problems putting them into my eyes...
Yeah you see, when I tried to put in the right lens it just didn't want to stick to my eye. D: It kept flattening on my finger (even though my finger wasn't wet of the solution) and when I finally got it to stay in my eyeball it stung, folded itself in half (still inside my eye) and came right off when I blinked! But luckily a few more tries later it finally stopped being a rebel and went in. It made my eye red and watery for some minutes.
The left one went in without much of a fight, funnily enough?

One lens in, notice the enlargement effect.
But I must say that in terms of comfort these are not very good – ever since I put them in I kept feeling that I had lenses on at all times; they give the dry-eye feeling very quickly and I kept blinking more than I do while wearing other lenses. Also soon after I had inserted both lenses the right one decided to sting like hell, out of nowhere, and it was bad enough for me to be tapping my eyelid and rubbing my eye rather furiously. I was on the verge of taking it off but just when I thought I'd seriously do it the stinging feeling calmed down. Left lens didn't do anything similar but –just as with the right– I obviously felt that the lens was there and after only two hours of wear I already went to take them off. They felt dry and the constant "piece of plastic in the eye" feeling just got unbearable for me. :<
The comfort is disappointing and I kinda wish they would be more comfortable, because then I would like them a lot more. :/ I just don't like wearing colored contact lenses if I feel clearly that I have them on; it starts to bother me rather quickly if the feeling doesn't go away.
Then again, I've been extremely tired the last days (my eyelids feel like bricks at least half the day, it's horrible) so that might have contributed to the discomfort of wearing lenses; my eyes could have been extra sensitive, dry, tired or something...

Here comes now the usual close-up photos of me wearing the lenses. All photos are without color filters to show you how the lenses really look when worn. All photos are taken during a semi-sunny afternoon with plenty of clouds around.
If anyone wonders my natural eye color is a blue-gray with a slight greenish tint (depending on light) and a golden circle closest to the pupil.
All photos are taken by me, Shiro Samurai. As per usual.

In my apartment, facing the window.
In my apartment, with only natural light. All lamps are off.
Bathroom light.
Flash photo indoors.
Right under a very yellow light in the corridor.
Next to a weak yellow light in the staircase.
These lenses have a surprisingly nice shade of brown to them even though the design itself is rather basic, which isn't really a bad thing. The brown color shows up well and makes even my light eyes look almost as if they could have been naturally brown. :) There is a very slight hint of orange in the lenses too.The center of the lens seems to blend/fade very slightly into my eyes and you can see my real eye color peeking through the middle. I think that the contrast this gives is rather cool-looking!

Outdoors facing the light, but being under a roof so that the sun
doesn't hit me directly.
Facing the sun directly.
Facing the sun when it was partly covered by clouds.
Back against sun.
Facing a corner of the building outside, back against the sun.
The limbal ring has a kind of fuzzy look to it so when worn it gives a smooth overall effect and doesn't jump at you; I would say that these lenses are definitely meant for natural or soft makeup everyday looks rather than for the vivid lens needs of a cosplayer and if not for the subtle design and color then for the very small enlargement effect. You just won't be turning many heads –both near and further away ones– with these because they don't give the dramatic 'oomph' extra push that some other bigger and more vivid/patterned circle lenses give, at least according to me. These lenses are definitely for subtle looks and are probably best fit to wear to places where you don't immediately want people to look and go all "hnn~, are you wearing contacts today?" at you.
Yes, naturalness is the department where these lenses shine!

Lastly, distance photo!


Short summary:

Color: 6/10
The lenses have different shades of brown in them, which makes for a natural light brown blend. Color is nice.
Design: 5/10
Rather basic-looking design but that's okay, it's pretty in its own way. It just doesn't fall quite into my tastes; I'm more into bolder and artistic lens designs.
Opacity: 7/10
Not super opaque but they definitely deliver – I mean, my eyes clearly do look brown with these!
Enlargement: 2/10
There's not much enlargement to be spoken of here. These are really small circle lenses but that's for the better, considering the strong point of these is looking natural, after all.
Comfort: 3/10
I really don't find these comfortable to wear. :( I kept feeling them in my eyes at all times and after only 2 hours I took them off because they felt dry and I couldn't stand it.
Naturalness: 8/10
These are pretty damn natural, what more do I need to say?

That'll be all that I have to say for this time!
Thank you Klenspop! ♡

May 6, 2015

Summer/Autumn convention plans 2015!

Hellouuu!

The summer con season is about to start and I thought that I'd make a quick list of where I am likely to be seen this summer. Let's go!

First off I want to give a heads up in case you aren't following me over at Facebook (do iiit~), where I already made it clear that I AM NOT ATTENDING DESUCON THIS YEAR. I'm sorry for all those who wanted/expected to see me there but I have my reasons not to go. :( One of the most obvious ones is that the tickets sold out lightning fast (I heard within 6 minutes??) and I completely missed it, boo. And then there's the rest...

Okay so, no Desucon. Where am I going then? (or at least trying to go)
Here!

SKECON 3-5th July http://skecon.se/  

NÄRCON 23-56th July http://2015.narcon.se/

NERDCON 14-15th August http://konvent.se/nerdcon-2015/

TRACON 5-6th September https://2015.tracon.fi/


That's about it for the main ones; Närcon is not yet set in stone (I'm still considering it) but the others I'm 95% sure to attend, except for Tracon which is also on the still-considering list, although slightly more likely than Närcon. Because Närcon is butt expensive for me in terms of travel costs.

The Finnish Kitacon is not on the list because it's seemingly still unsure if the whole event will even be held this year – if anything it's gonna be during autumn (instead of the usual winter/spring) but as far as I know it's still rather uncertain and no dates have been announced. But if Kitacon will be held then I'm likely to go there.

I'm reserving myself for any changes to the plans. I don't guarantee that I will end up in all of these but that's the plan (you never know if anything happens that makes it so that you suddenly can't go etc). I also might have missed to mention other events for various reasons...

That's all for this time!
What conventions will you attend? Tell me in the comments! ~

May 2, 2015

[Sponsored] Lens review: TheDollyEye Georgiae ML3 Brown

Hello everyone! I hope you're doing fine! :)

I am back to share a review of another pair of circle lenses with all of you guys! ♡
This time it's the Georgiae ML3 Brown from TheDollyEye!
This pair was sponsored by the lovely LensVillage – I really recommend their store! Check it out! o/ Oh, and if you want to read more about them then check out what I wrote on this review!

Psst, even though this pair of lenses was sponsored my reviews are always 100% my honest opinion, I promise.

You can use my discount code "10SHIRO" to get 10% OFF on your purchase from LensVillage! ;) Limited time only! Last day is 30th May 2015!!


Base curve: 8.6 mm
Diameter: 14.5 mm
Water content: 38%
Life span: 1 year (I recommend 6 months)

The lenses have this kind of brown shade that borders on an orange caramel-ish color. It's rather cool!
It was really hard to get them to photograph right so I took several photos of the lenses in the bottles, so that you get an idea of what they look like.


Flash photo.
The lens on the left shows the "wrong side".
As you can see the pattern is pretty. I don't really know how to describe it but it's kinda soft-looking and looks a bit like some kind of stylized sun flares. :)

By the way, these lenses are one of those that are easy to tell which side is right side and which side is "wrong" side! The "wrong" side is notably lighter and looks more washed out than the right side.

Lens on my finger, "wrong" side is showing. (bathroom light)
The first time I put them in I had no problems with the right lens, it went in just fine and I stopped feeling it in my eye pretty much immediately. But the left one had a different plan – as soon as it was in my eye I noticed that it felt slightly "thicker" than the right one. I could feel it when I blinked, as if my eyelid rubbed against the lens because it was in the way when I tried to close the eye? I don't know what exactly but it was kinda unpleasant. Otherwise the left lens was fine; it didn't sting or hurt my eye or anything. But the eyelid thing was bothersome and it made my eye feel tired somehow. Luckily the eyelid-hitting-the-lens feeling went away after around 20 minutes...

One lens in. This is to show enlargement effect.
My natural eye color is a blue-gray (more blue though) with a hint of green, depending on the light.

Below are some photos of the lenses being worn in different lights. All photos are taken around 12:00 during a cloudy day. Colors are unedited to show how the lenses really look.
All photos in this post are taken by me, Shiro Samurai, as always.

Indoors, facing the window.
In my apartment, under the lamp.
Flash photo indoors.
Bathroom light.
Facing the window in the corridor.
White light in the corridor.
Yellow light in the staircase.
I think these lenses are surprisingly nice when worn! Although they look almost orange-toned when not worn they take on a soft brown when on my eyes.
These lenses are quite big and they also have a rather wide pupil hole, which makes it so that my real eye color shows through in the middle and blends in a bit with the brown lens the effect it gives is very nice! It doesn't do the most natural blending ever but it still looks cool.
Oh, and regarding the design of the lens it mostly shows when you are fairly close. Otherwise, from a distance, it just looks like some funky brown with some interesting pattern going on that you can't exactly pinpoint what it is, haha.

Following photos are taken outdoors, around the same time as the previous batch.

Facing the light but the sun was under the clouds.
Facing the light when the sun is peeking out.
Facing a corner of the building, back against light.
Regarding comfort I can say that the first time I wore these I had them on for about 6 hours. I started feeling them in my eyes slightly after the 4-hour mark and by 6 hours I just wanted to take them off, although I could have worn them longer if needed. Then again, I was on the computer most of the time I wore these, so that might have added to the feeling of the lenses drying.

Lastly I have a photo of me wearing the Georgiae ML3 Brown from a distance!

Nintendo Gamecube. ♡
Short summary:

Color: 7/10
Nice medium brown shade. Reminds me a bit of toffee or something, haha.
Design: 8/10

I must admit that these lenses have a rather gorgeous patterning!
Opacity: 6/10

Not super opaque but they clearly make my eyes appear brown.
Enlargement: 7/10

These are pretty big.
Comfort: 7/10

Comfort is okay. The left lens felt thick in my eye and interfered when I blinked, but otherwise I could wear these lenses for about 6 hours before I felt like I really wanted to take them off.
Naturalness: 2/10

The obvious limbal ring and the size won't make anyone think it's your real eyes.

Remember my discount code "10SHIRO" if you plan to buy lenses from LensVillage! It gives you 10% OFF on your whole order! 

Thanks for reading! Bye bye ~