April 15, 2014

More armors for Masamune

 Hello everyone!

Back on 13th February I started another armor making process for Masamune, this time his upper leg armor pieces.

Character reference.
I decided to roll with polystyrene once again and so I did some measuring and cut out two fitting pieces. I noticed after cutting that even though they had the right measures they weren't perfectly straight – oh well, it's not too bad...

Cut out polystyrene pieces.
Originally I had planned to make the armor out of several separate pieces layered over each other but I then remembered the amount of gluing failures I've done earlier with this plastic so I thought I'd do it another way an easier way. So, with the pieces cut out I took a measuring tape and measured where each "edge line" would be and then just divided the length of the piece with the number of lines and started marking with a pencil.

Pencil marks added and yes, I used the knife box as a ruler.
On 5th April I decided to try if my idea would work or not – basically applying a line of hot glue on the lines I had drawn and then heat-shaping the polystyrene into the right shape. I had been going back and forth thinking if this would even work and being worried that the hot glue would get sticky again because of the heating; I figured that the only way out was to try it on a scrap piece.
But before the hot glue experimenting I wanted to check if I could cut a line into the plastic for the attachment purpose basically a hole to pull the ties through. I had no proper tools for this so I tried with a kitchen knife. I had to use quite a lot of pressure and I managed to cut pretty deep into the plastic but on the other side it didn't go all the way through so yeah, in other words it didn't work out.

The side I cut on.
The backside. Didn't go through. :(
With that tried and tested I had to go ask stepdad for better tools; if nothing else I'll use the drill he has but maybe if there was something that would do a line instead of a hole it would be more convenient.
Well well, now back to the gluing I took a scrap piece, heated the glue gun and carefully applied a thin line as evenly as I could manage.

I know it's beautifully straight. Not.
When the glue had cooled down I carefully tried to bend the plastic and the glue moved with it – no cracking or loosening or anything! The hot glue didn't turn liquid-ish again; it didn't move even when I was heating the side it was applied on. Only thing was that at the very edges a super small bit of glue softened and thus glued onto my glove so eh, I guess it could turn sticky again if heated enough or too close...
Oh well, I took the heat gun and shaped it the same way I would shape the actual pieces.

Success!
With confidence and proof that it would, hopefully, work as envisioned I began to work on the actual armor pieces. Next in line was to do five glue lines. Slowly. Carefully. Caaaaaaarefullyyyyyyyyyy.

One done, four to go!
It was more of a pain than one would think I ended up with aching shoulders because I was doing it with my head almost in level with the table and the glue gun arm held up. Also constantly having to keep the same pressure on the glue gun's trigger (reason: have the glue come out as evenly as possible at all times) made my hand hurt and cramp; when I was working on the second armor piece's final lines it was hard to keep my hand steady, because of the shaking that occured when trying to keep the same pressure, aka not moving my hand from the trigger. It wasn't the best gluing experience but I still think it turned out pretty okay.
At some point I think the glue gun got too hot because the glue just flowed out without me even trying to get it out and it did this "glue bump - line - glue bump - line" pattern that was just not what I wanted so I took it off for a while to cool down. Also, when the "mouth"/tip of the hot glue gun accidentally touched the polystyrene it melted very slightly. Actually, I ended up noticing that you could use the glue gun even when it was not plugged because it took quite a while to cool down... xD

One armor piece done.
One 7th April I heat-shaped the armor pieces. It all went well except that it wasn't the easiest to get both pieces to bend an equal amount, but after some tries it worked out alright. The only mishap that happened was that while I was heating one of the armor pieces I accidentally moved my arm over a spot with a glue line and some of the glue stuck on my glove. It wasn't too bad though, I just grabbed some paper, wiped off the smeared mess on the armor and poked the remaining semi-hard glue back in place with my nail. No harm done.

One armor piece shaped.
I finished these armors today on 15th April. I had gone to mom's place because I needed to use the drill and the spray paints were there as well. I went to ask stepdad for advice about the drilling and after some brainstorming we agreed that the best approach to get holes in these things for the attachment elastic bands was to do several small holes in a row. Actually he did the measuring and drilling for me because one has to be very careful and well, he's kind and I'm derp.

Notice the pencil markings at the left and right corners.
Holes drilled.
Closer view of the holes.
Stepdad then went to fetch the utility knife so that we could clean up the drill holes and make room for the elastic ribbon to pass through. He also did the cutting part.

Cutting time ~
Trimmed hole.
Next step was for me to do the sanding. I used some 120 grit sand paper to even out the holes a bit more, you know, to make it less obvious that there were a lot of small drill holes. I also sanded all around the pieces to nicen up the raw cutting edges I made back when I cut these things out.

Sanding time ~
With that done I figured it wouldn't hurt to use some very fine grit sand paper to scratch the surface of the plastic very slightly to get it to take in the coming spray paint a bit better. Here we go!

My sand paper of choice.
Sanded surface.
Okay, so now my armor pieces had slight sanding dust on them. The thing to do now was to take some paper tissue, wet it with a slight amount of turbentine and cleanse the plastic by wiping it carefully. I avoided touching the hot glue decorations.

Turbentine.
So with the surface free from sanding dust, fingerprints and such it was time for the actual painting job. I used a semi-gloss black spray paint and sprayed away. Outside, of course, in a well ventilated area; this thing is not fun to inhale a lot of.

Spray paint coating recently added.
While I watched the spray paint dry I noticed these unsightly bubbles that had formed on one of the armors. I don't know where they came from but I certainly wasn't planning on letting them reside on my black goodness! I just took a paper tissue and wiped the surface above the bubbles. The bubbles went with it along with some paint that had not been set yet. I just repainted the wiped spots afterwards.

I don't like what I see...
... that's better.
Now I just had to play the waiting game and add new coats of paint when the earlier ones had dried. When the front was painted I turned the armors and painted the backside; when these had dried I took them inside and went to fetch the elastic ribbon that I'd use for attaching these things to my legs. Yeah, I cut four pieces of some black elastic and secured the ends with a zigzag stitch.

It's important to zigzag!
I then took one of the elastics at a time and started threading them through the holes in the armor and sewing them on. I quickly noticed that it was possible to sew the elastic on at one side with the sewing machine – saves time!

Sewing elastic in place.
What I also noticed was that to fasten the elastic on the opposite side was close to a physical impossibility if you wanted to do it with the machine, that is. So, in other words, I just sewed one end of each elastic onto the armor by machine. Like this:


At this point I had to leave and go back to my apartment, but before I left I took with me some items for handsewing and some black thread. At home I sewed on the other end of the elastic by hand. I had to keep the stretch tight with one hand and sew on the elastic with the other but it all went well.

Sometimes handsewing is convenient...
Armors done I quickly put on my Masamune cosplay pants and put on the thigh armors I'm surprised it actually works as well as it does! Sure that it doesn't look the most impressive ever but I'm satisfied with the results.

Quick armor test.
One thing's for sure though, when I finish this cosplay and wear it out to an anime convention I will have problems sitting down because of all the armors... and I will need help to dress. Outch.

Yeah, that's it yo! See you later alligator!

April 4, 2014

Quick rasetsu version Saitou preview

Yep, more Saitou coming through!

I've wanted to cosplay rasetsu!Saitou ever since I got me some red contact lenses. I had been looking for a decent wig for quite some time until I found one it's a bit more silver-gray than pure white but I still think it will do... for now at least; I'll likely replace it in the future if I ever find a better one.

Oh well, today I had a quick preview test outside just to see what it will look like!
Photographer is Hasakitsuki.


It was a bit windy and cold so we didn't stay outside for long. I don't know really what's up with these contacts but when I put them on they were uncomfortable and I had to take out them and put them back on. On the second try it was bearable but I still felt them when I blinked and I'm sure that the earlier times I've worn these they haven't been as uncomfortable maybe they are expiring? It hasn't been one year yet but at least half a year since I opened them. It feels like they dry out quicker than before and I took them off immediately after the shoot because blööörgh. I think I'll end up buying new red contacts for the summer con season because hey, who wants to wear uncomfortable contacts for a whole con day? Certainly not me.
Oh, and speaking of summer con season I'd just clarify that yeah, rasetsu!Saitou will hopefully appear in at least one summer/spring con this year. I have no idea yet which one though...

I don't have anything else to say really, I just need to start looking for new swords because my former wooden ones broke at Tracon last year and I have yet to find a replacement. I'm looking but it's proving to be much harder than what one would think to find a katana and wakizashi set that doesn't cost me my limbs, that looks decent (aka no wall-hanger crap) and is generic enough to work for most characters. I'd prefer dull metallic swords if possible but I'm checking for wooden ones as well...

March 25, 2014

Saitou gets an update for the better!

Hello peeps!

On 19th March I decided it was about time that I cut my Saitou wig a little. Sure that it has always been fine but for the past few months it started bothering me slightly that the bangs are kinda long mostly because they block out my right eye and this doesn't always look good on photos. So yeah, cutting time!

Before cutting to the left, after on right.
Also on the next day I went to a fabric store in town and bought some fabric for the scarf. Yeah, I do have a scarf already but, as some of you might know, it loves itself some strangling antics and it's just heavy and annoying to wear after a while; I've wanted a thinner and more flowy scarf and so I decided to make another one. The fabric that I bought was unusually wide around 2,4 meters so I only had to buy a small strip of it. I didn't purchase more than 30 cm, although afterwards I realized it wouldn't have been bad with a bit more. I tend to always buy too much fabric for bigger projects and not enough for smaller projects, lol. Not like it was bad though, the scarf turned out okay anyway.
I didn't really take any progress pictures because it's so simple to sew a scarf just zigzag the edges, fold in the edges, fold the whole thing in half and sew it shut with a straight stitch.

Started sewing the scarf shut.
With the scarf done I was ready to go take a few photos and so I did on 25th March, aka today.
Me and Hasakitsuki (photographer) went outside the apartment and had a quick shooting to show off the costume updates; it's nothing mind-boggling but still something fresh!

The scarf seen from the back. (yeah I know, should have ironed it...)
This fucker even blows in the wind! 8D (if you're lucky)
I'm still a bit meh because I would have wanted the scarf a bit wider (yeah, it still bugs me) than what it is but oh well, at least there's no way in hell this thing could attempt strangling techniques on me anymore, unlike its predecessor. It's very lightweight and comfortable and cost me 4 € to make.

Enough of the scarf. Next up is a photo that shows the wig's makeover better:


Oh the joy when the wig doesn't completely block out my right eye anymore! I still frequently have to move hairs away from my eye especially when it's windy before a photo is taken but at least it looks better and hey, it's never bad to be able to see properly in cosplay. xD
Lastly here's a cropped close-up of the contact lenses that I will wear for Saitou from now on. Yeah, it's totally the reason I opened my Beaucon Vibrant Match Blue lenses. Surprise motherfucker!


Sure that his eyes are violet-ish in the anime but in the game they are blue and well, the game came first so I consider it the official/original. Blue-eyed Saitou it is, deal with it ~

That's it, new cosplay previews for this year's con season will follow!
Valkoinen Samurai says bye!

March 21, 2014

Lens review: Beaucon Vibrant Match Blue

Hi everyone!

It's time again for another contact lens review guys! This time it's the Beaucon Vibrant Match Blue. I bought these some time ago and I've been waiting for a reason to open them and well, the reason you will find out in another post soon but now let's get on with the review!

Lenses in vials.
Base curve: 8.6 mm
Diameter: 14.0 mm
Water content: 45%
Life span: 1 year (I recommend 6 months)

These lenses look a medium blue when not worn; they are rather pretty if you ask me. I like the design of these surprisingly much and I think I'm starting to really prefer lenses with a black outer rim haha. Regarding the design there are some small black dots close to the pupil hole following a star shape, otherwise the blue color is pretty solid while also imitating the patterning of a real iris.

Lens on my finger.
One thing that's not so pretty though is that when I tried to open the bottles I had problems with not one but both of them. The plastic lid just went off without taking any of the metal protection with it. Meh. I had to fetch a knife and massacre my way through the metal...

This is not cool bro.
Not saying this only happened with the Beaucon lenses; I've had this problem with pretty much any lenses. I think it's just how lucky you are if you get a metal troll in yours or not. xD
But yeah, back to the lenses. I popped one into my eye and it went in without any problems. The description on the bottles say that the diameter is 14.0 mm which is pretty much as small as circle lenses can be.
These blend really well with my natural eye color and look surprisingly natural while still having that noticeable color oompfh. I actually went to do some quick business with these on and didn't get any comments or questions I assume either the light was too bad for the others to see or these lenses just look natural enough to pass for real eyes. I would say these are good for cosplay as well as for everyday fab contacts.

One lens in. (taken in bathroom light)
These contacts don't hinder my vision; I have no random blue corners when I move my gaze or anything. They are pretty comfortable but even though I wore them for around 4 hours I could still always feel that I had contacts on, it was slight though. It wasn't uncomfortable at all or anything but I just felt them when I blinked. Also, maybe it's just me but it felt like these started to feel dry faster than other contacts I've tried. I don't know, might also be because putting contacts on was pretty much the first thing I did today when I woke up and well, my eyes were a bit tired. Nothing bad though overall, I'd still say they are comfortable to wear.

I took a couple photos just to show what the lenses look like when worn. There's no color filters or anything to alter the color on these photos.

Taken indoors during daylight hours on a cloudy day.
Taken while facing the window from a distance.
I don't really know what more to say. I find myself liking the blue shade a lot and I'm pleased with these contacts. They aren't super noticeable in darker/dim lights but in brighter lights or outside they turn this vibrantly awesome blue that is striking and just looks some sort of awesome. I definitely dig these contacts.

Took a distance photo just for demonstration.

(am I the only one thinking Kuroko from Kuroko's Basket? xD)
Want to read reviews of other colors in the Vibrant Match series?
Check out these reviews: Green, Violet, Brown

Short summary:

Color: 9/10 
Nice vivid blue shade that shows up nicely. Looks great on light eyes!
Design: 7/10 
Design seems to mimic real eyes and does it well.
Opacity: 8/10
Covers my real eye color surprisingly well!
Enlargement: 2/10 
Barely enlarging, which I like. I don't always want obviously enlarging lenses...
Comfort: 6/10 
I can sometimes feel I have contacts on when I blink and they seem to dry out faster than some other lenses, still okay though.
Naturalness: 7/10 
Except for the vibrant blue shade these look pretty damn realistic.

I don't have so much more to say I think.
Any questions just leave a comment! :D kthxbai! ~

March 14, 2014

Souji Okita from Rurouni Kenshin photoshoot!

 Hi everyone!

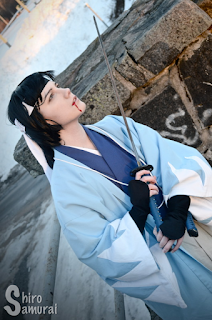
A few days ago I received a few new wigs and one of them was a wig that I plan to use for Rurouni Kenshin's Souji Okita the Tsuiokuhen/Trust & Betrayal OVA version. Yes, I do plan to cosplay him this year!
Okay, so today I tried the wig on and decided instantly that it needs to be cut a bit to fit him and so I trimmed one of the sides, the one with the longer end, as well as shortened and layered the bangs so that I wouldn't get the Rock Lee effect when wearing it, brrr. Yeah, it had way too much hair in the front. ._.

Wig uncut, without the ponytail clip.
With the wig styled I put on the rest of the cosplay which is basically recycling parts from earlier cosplays, haha. The violet-blue kimono is new though and it's made by Hasakitsuki's mom as a gift, thank you. I wore my Volte Brown contacts for Okita and I think they are perfect for him!
I wanted a cosplay preview and a photoshoot on the same go and so we went outside the apartment and took a shitlot of pictures; it wasn't all that cold at the beginning but it was very windy and towards the end it got so damn cold I could barely move my fingers and hold the sword and, well, I was shaking quite badly... which could have been seen as being in character *coughsickcough* but oh well. ^^"

Cosplayer: Valkoinen Samurai (Souji Okita)
Photographer: Hasakitsuki


Nothing more to say, I'm terribly stoked to wear this to a con! I hope I will find someone who cosplays Battousai version Kenshin so that we could have an epic photoshoot. Would be so awesome!

But now Valkoinen Samurai goes samurai-ing elsewhere ~

March 11, 2014

Dokuganryu, you have too many swords – pt.3

Hello peeps!

Way back on 1st September last year I went to mom's place and continued working on Masamune's swords. I didn't get all that much done that day but I at least started sanding and filing down the tsuka (sword's handle) with a rasp and rough sand paper. The blade I had filed and rougly sanded already earlier. I only had time to sand one of the swords because I was helping Hasakitsuki with her cosplay as well.

Tsuka untouched.
Filed and roughly sanded.
I still need to give the remaining five swords the same treatment but I did ask my stepdad if I could borrow the rasp and rough sand paper – it was green lights!

Okay, fast forward to a weekend in the middle of February 2014 when I finally got to work on the swords again; I have no idea where the time went but I know for sure that it's about time I continue this mission!
I spent 14-16th February at mom's place and took with me the swords and equipment for woodworking. I filed and roughly sanded the tsuka's end round-ish. Rinse and repeat for the remaining swords over the duration of the stay, until all six had gotten the same treatment. I must say it's rather tiring to do this process all by hand but that's how I roll.

Even more sanded and filed.
All six done.
But when I was done and checked the swords over –for any spots that I had missed– I saw this unsightly view instead:

Hey wait, what's that...?
*zooms in*
IT'S A CRAAAAAAAAAAAAAAAACK.
I have no idea when it appeared but I know it wasn't there in the very beginning – it must have appeared at a later point, possibly during the last days. Oh well, I need to fix it somehow and the safest bet is to wait until mom and stepdad returns and ask him what to do about it...

So on 2nd March, while I stayed at mom's place over the weekend for Kitacon, I took with me the swords there. I showed the crack to stepdad and after getting some possible explanations for how it could have appeared he said he'd fix it for me. After the anime convention but before I left to return to my apartment he had repaired it and I could take it with me home. This is what it looked like:

Mended crack.
He said that he filled the cavity with some glue and then used car putty/filler on top. It's repaired now which means that I can continue the finer sanding work of the swords. Yes, I need to sand all the swords once again – but this time with even finer grit sand paper. I want it to be really smooth before I put any paint on them...

On 7th March I decided to start doing the final sanding of the swords (tsuka and the whole blade length) and this time I did it outside my apartment with some borrowed sand paper... from stepdad of course, who else?

Finer grit sand paper. (this brand is nostalgy for me because
in old woodworking class in school we had the same brand)
I only managed to finish 2 swords before my arms wanted to quit though; it's more tiring than what it looks like and I pretty much only sand with my left arm because of the finer precision (I'm left-handed) and it just feels less clumsy so yeah, when my left hand gets tired it gets annoying because my right hand just won't do the work as well. Blah.
On 10th March I sanded two more swords and on 11th March, aka today, I finished the last two.

Here's some comparison shots of both sides of one of the swords:

Top photo of roughly sanded side, bottom photo of finer sanded side.
And finally a close-up photo of one finished blade next to one unfinished:

Top sword finely sanded, bottom roughly sanded.
Sweet Jesus, I'm done with the sanding! Now I just need to find something to use as a base coating before I can get on with painting these things. I was thinking that gesso would be good but I have to find some first... otherwise I'll just use ordinary white primer. We'll see.

But for now, Valkoinen Samurai out!