
Greetings!
For a pretty long time now I've wanted to add something extra to my Hakuouki cosplays, namely a shinsengumi nobori - a banner or flag or whatever you want to call it. They had at least two different ones in Hakuouki that were shown in the openings (at least first and second season) and in some anime scenes. I had been smart and screencaped a scene in Reimeiroku long time ago with both banners visible for future reference. Aaw yeah!

So my plan was to make the big red one. Back in 25th June I started the project and I ran around mom's house pretty much all-day working on the banner like a madman. I must have been crazy because basically all bodyparts that could have hurt physically did so the whole day and still I kept working on it.. my feet hurt so much it was tiresome to stand, back hurt so I couldn't sit unless I leaned against something, hands hurt, arms hurt etc.
Oh well, what I did first was drawing those kanji on pattern paper and cutting them out.
 |
| This worked as my second reference |
 |
| The two dots are placed inaccurately, I just put them somewhere |
 |
| Fabric cut out and broomsticks used as size reference |
 |
| "White mountain stripes" ready to be cut out |

And then I sewed the white parts on with longer-than-usual stitches close to the edges to secure them in place.

And after that I sewed a narrow zizgzag on top to keep them from fraying. Also this made it look cleaner and nicer.

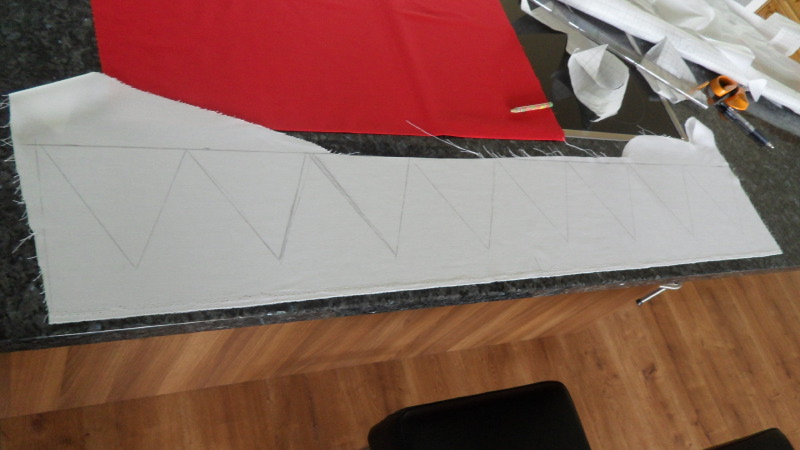
I then prepared to do the same for the kanji but first I had to take some yellow fabric, trace the parts onto it and cut them out. It was very tedious I must say... but I managed. With the kanji pieces cut out I tried positioning them on the fabric to figure out where I wanted them to be.
 |
| Looks promising ~ |
I also tried handsewing the kanji on at one point but quickly decided it was just as annoying as machine sewing. I let it be for a few days and on 28th June I felt like trying to work on it again.
 |
| Straight helping/securing stitches to keep it in place |
 |
| Edges zigzaged and trimmed |
Several hours later I had this and man did it feel friggin' good!

...
Only problem - the joy was short-lived.
There was another kanji waiting to be appliquéd to the other side of the flag; the cut-out appliqué pieces in the small heap next to the sewing machine probably morphed into Cosplay Satan of Thousand Slow Deaths at this point and burned holes in me, one stitch at a time. After all, I had been a good boy and planned to have the design on both sides of the flag because that would be cooler and OH GOD WHY DO I INFLICT THIS TORTURE ON MYSELF??

After forever had passed I was done with the other side of the flag. I'm pleased with it though so it wasn't a complete hell.
 |
| Don't mind the wrinkles, this was taken before I ironed it.. |
Now the only thing left was to fix those holding loop things so that I can mount the flag on the pole. I first thought to make them out of the same red fabric as the flag itself but figured it would be less work to just use bias tape. Only problem was that it seemed mom's "fabric storage" didn't have any red bias tape, only shiny red ribbons in different widths and I'd rather not have shiny flag loops.. just no.
...
......
Okay, so June went and July did too without me touching the flag. I didn't have time (and July was filled with anime conventions) but at some point I went to check some fabric stores in town but they didn't have any red ribbon that I thought would work; it was either too narrow, too wide, not the right shade of red or it was shiny. I decided "fuck red ribbons, I'll go with white" and then remembered mom had the 3 cm wide natural white ribbon that I had used for Masamune's coat trims. Yes!
On 7th August I checked the white ribbon against the flag and decided it was the way to go! But firrrrrrrrst I had to sew the flag closed because I realized my earlier plan to first attach the flag loops and then sew the flag closed wouldn't work because, well, the loops would be in the way. Duh.
 |
| Sewing flag closed |
With the flag sewn closed I started measuring how long I wanted the ribbon loops to be and then I measured the spacing, aka how much distance I wanted between each flag loop. With that done I started cutting out the loops in the right lengths and pinning them in place.
 |
| One flag loop pinned in place |
After I had cut out all the loops and pinned them in place I just had left to sew them on. This was quite a challenge because I just had to hope that the loop's other side (the side being against the sewing machine) would be of the same length and that I would sew both sides on at the same try. I had some weird luck because I managed to get pretty much all loops -except two or three- on with no problems, woot!
I took a rasp (a coarse file for woodworking) and marked on the longer pole where I wanted the notch to be for the crossbar and then I just.. well, made a notch.
 |
| Notch after sanding (it cracked a little..) |
 |
| Pole sawed in half |
 |
| Preparations complete |
 |
| Painting started! (this is the now 75 cm crossbar) |
 |
| That table was an awesome pole drying surface the gaps in it were just right to keep the pole from rolling away. |
-------
Okay, so with that the pole was done and the flag too!
With both done only the "how to assemble this" part remained. I had planned to keep the flag as travel-friendly as possible and that meant I didn't want to hot glue the crossbar in place with the flag on or else I couldn't disassemble it for easy traveling/storage.
I checked around and found a roll of black elastic ribbon that I figured could work in keeping the crossbar in place, booyah! So I just cut out a fitting piece of it, zigzaged the ends and tied it around the crossbar and boom, say hello to my
 |
| FINALLYYYYYYYY |
Yeah, that's that. I'll totally be taking this banner with me to future cons whenever I'm donned in a shinsengumi outfit and feel like bringing it along!
Looking good also I need to see it IRL =D
ReplyDelete