October 30, 2017

Lens review: Angelic Eye Mesmerize Green

Hello ~

Here comes my review for the Angelic Eye Mesmerize Green circle lenses! I must admit that I had high hopes for these lenses so now let's see how they tallied up!


Base curve: 8.6 mm
Diameter: 14.5 mm
Water content: 45%
Life span: 1 year (I recommend 6 months)


I've said it before on other reviews but I've taken the habit, by now, to always mention if I think that a particular circle lens might be exclusive to a certain online store and in this case I do think that the Angelic Eye brand might only be found at HoneyColor – or at least that's the only place I've ever seen them in. So yeah, there you go if you want these in your collection.

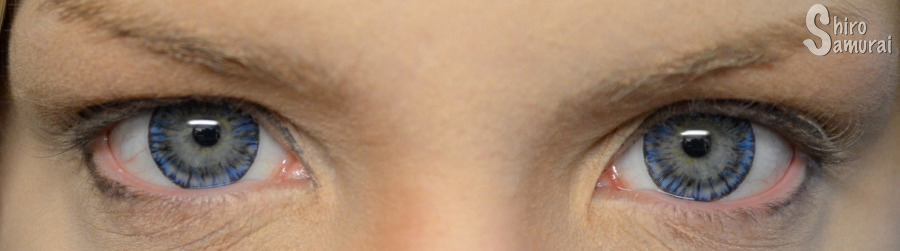
I originally bought these lenses almost exclusively for the rather... mesmerizing design, lol. And also I couldn't find any reviews on these and someone's gotta be first! :D I was really hoping for this kind of almost magical and crystal-like effect combined with a bright color and I guess I, sort of, got what I wanted? The color doesn't 'pop' as much as I wished but there's this gorgeous halo effect instead that comes from the lenses being quite transparent in their coloring. Oh and yeah, speaking of color
– if you look closer on the print of the lenses you'll notice that it's not only green in there but also some yellow pixels; it's a pretty small detail but it does add up to the color appearing to have more depth and naturalness to it as it's not just a single color lens.

One lens in.
I have naturally light blue-gray eyes, but there is this slight tint of green that seems to come out in specific light conditions... or if I wear green lenses like this. I'm happy to notice that the color, despite not being super pigmented or anything, doesn't seem to turn this ugly muddy color in poorer lights as green lenses tend to do for me.

The size is generous and I must say that this is the kind of lens design and size combination that looks really alien on my eyes without any kind of makeup to balance it out. xD I do see these first-hand as a fashion lens but I guess they would be suitable for cosplay too, assuming that color intensity is not on your priority list. Anyone looking for a lens with decent color and a mesmerizing (hurr durr) halo effect will be pleased.

Lens photos ahead!
All photos taken by me during an October afternoon on which the sun was visible but covered by a veil of clouds.
There's no color filters or such on the close-up photos and that's so that the colors would be as true to real life as possible.


Bathroom light.
Yellowish light in my apartment.
In my apartment, only natural light.
Flash photo.
Facing a window, not sun side.
Outdoors, facing the sun hidden under the veil of clouds.
Outdoors, back against the sun.
I guess in the end I sort of like these lenses but there's that part of me who wishes that the color would be more intense because, as it is now, while pretty up close the color becomes hard to notice from a distance – which limits its use as a cosplay lens, sadly. I do love how alluring and almost ethereal the Angelic Eye Mesmerize Greens look otherwise and yeah, all thumbs up for how well these play for any kind of mysterical fashion (goth etc) setup!

And the comfort, while okay considering my horribly dry eyes, it could still be better – it's 2 hours and then I need to take them out because they dry the shit out of my eyes. I feel them when I move my gaze around (it's not hurting or anything) but at least they do not blur my vision or feel scratchy etc. I do need to mention though that my comfort grade might very well be off the charts as I almost forgot about these lenses and only got to open them from their little glass bottles one month before their expiry date so yeah, take my words with a grain of salt as my comfort experience might not be fair nor accurate. Also, everyone's eyes are different and I happen to be gifted not with these über-dry and sensitive eyes which means that for me to give a high grade in comfort a lens needs to be like god tier or something, lol. I judge by my own eyes (and so does everyone else) so always keep that in mind when checking out contact lens reviews by other people. :)

Distance photos!


Curious about Angelic Eye Mesmerize lenses but in other colors?
Check out this review: Blue

Short summary:

Color: 6/10
Pleasant green color that appears quite natural. Sadly not very visible from a distance.
Design: 7/10
Magical crystal-like design that creates this alluring 'halo effect', really nice!
Opacity: 5/10
Definitely looks green but the pigment density is sparse and thus there's quite some transparency.
Enlargement: 7/10
Big and dolly eyes. Might look potentially weird without makeup – or at least it does for me, lmao.
Comfort: 3/10
2 hours on my dry eyes. My grading might be inaccurate because I almost forgot about these lenses and only opened them one month before expiry date.
Naturalness: 6/10
Apart from the size and the fancy design they look passable. The color is quite realistic and the way it blends is a nice feat.

Thanks for reading!
Shiro Samurai out.

October 27, 2017

Lens review: Beaucon Shimmer Blue

Hello kittens!

It has been a really cloudy and dull day today so yeah, I totally did a circle lens review with shitty light conditions. xD I wouldn't normally do it (I'm always waiting for a sunny day) but thing is that I have several pairs that I need to review, as soon as possible, because the expiry date is near and soon the polar night will kick in and it's gonna get nigh impossible...

Today's review is for the Beaucon Shimmer Blue circle lenses; it's a really small diameter lens with a natural look to it – now let's see how it fares!


Base curve: 8.6 mm
Diameter: 14.0 mm
Water content: 45%
Life span: 1 year (I recommend 6 months)


I am suspecting that the Beaucon lenses might be exclusive for HoneyColor so yeah, that's where to head if you want these lenses to your collection. This is not a sponsored review by the way; I just thought that I'd mention where to find the pair that I'm reviewing since it's not a common brand like GEO that can be found virtually everywhere, lol.

I mainly chose these lenses out of curiosity because I wanted to try something more realistic for a change. I usually pick all the fancy and colorful ones but now I decided I wanted to try something different, haha! And as I was saying these lenses definitely sit right in the natural department!

One lens in. Notice the enlargement effect.
As you can see I have naturally blue-gray eyes (or gray-blue?) and these blend in with my real eye color really smoothly, while still letting the blue of the lens maintain its effect. The color is a soft blue that seems to have a pretty dang natural shade to it, and because of the small size, these lenses don't look unrealistic nor 'pop' when viewed from a distance. The edges of the lenses have a slight black rim but even that is discreet in its intensity and thus doesn't distract from the natural look of the lens. This is definitely suitable as a daily or fashion lens for those who want some extra color in their everyday lives!

Lens photos ahead!
All photos are taken by me during an October afternoon with a dull, cloudy and 100% sunless sky. There's no color filters or such on the close-up photos and that's so that the colors would be as true to real life as possible.

Bathroom light.
Yellowish light in my apartment.
Flash photo.
Facing a window. (not sun side)
Outdoors, with my back against the cloudy sky. (if the sky
wasn't so gray the sun would have been in my back)
Outdoors, facing the cloudy sky and where the sun should have been.
This is not a cosplay lens, unless you want to opt for an invisible and as-realistic-as-possible look for your costume; it could work for movie and live-action characters but it's way too subtle to pass for any sparkly and big anime eyes, lol. 
I would use it as a daily fashion lens myself if it wasn't for the fact that I haven't, to this day, tried a single Beaucon lens that my eyes have approved of in terms of comfort :'( I'm starting to think that this brand is just not for me – I know how different people find different brands comfortable and that is perfectly normal because hey, everyone's eyes are different! But I personally keep having sub-par or poor comfort results with any and all Beaucon lenses I've reviewed and yeah, I'm starting to think that maybe I should just accept my fate at this point, lmao. The Beaucon Shimmer Blues are no exception to the rule – even when I put in eyedrops before putting on the lenses they literally feel dry and annoying after 20 minutes, more or less. These lenses are easy to insert and otherwise fine to wear but just, oh lord they dry so fast that I can't even...
It could just be me and my Beaucon curse, or it could be a combination of my really dry eyes and the lenses being near their expiry date (before I took them out of their vials; I almost forgot about them) affecting the comfort. With that said, please do take my comfort grade with a grain of salt as it might not be completely fair and/or accurate to the lenses.


Distance photo!


Want to see these lenses in other colors?
I've got ya covered: Green, Gray
 
Short summary:

Color: 6/10
Soft natural-looking blue color that blends well into light eyes.
Design: 6/10
Realistic design with a thin dark limbal ring and streaks of blue.
Opacity: 6/10
Enhances the blueness in my eyes but seems to turn a bit undistinguishable in some poorer lights...?

Enlargement: 2/10
Really small.
Comfort: 1/10 

Blew it for me. It could be the short expiry date and my dry eyes acting up but already 20 minutes in they feel dry and nasty. I count the loooong minutes when I can take them off...
Naturalness: 8/10
Really realistic! These will do it for a daily lens if you just want a splash of blue to brighten the day.

Shiro Samurai says bye! Thanks for reading~

October 16, 2017

Chibicon 2017 – My boss is a closet Ginga fan?!

Hello geeks!

It's been a while since my last convention, which was Närcon, but this past Saturday I went on a really spontaneous one-day trip to Oulu with a completely different con company than usual!
It all started a few weeks ago when I learned that my awesome cinema boss, Carina, has a daughter who's into anime and manga. Said daughter wants to start cosplaying, and had never been to an anime convention before, and so my boss asked me if I could accompany her to Skecon next month because she was too scared to go alone. But Sabine, the daughter, seemingly started doubting because Skellefteå is still quite a distance away and it's a 3-day con to boot – that's when I suddenly remembered that hey, Chibicon was coming to Oulu soon! This was literally like a couple days before the con, no joke. So I told my boss about this mini con, that could serve as a good first step for Sabine, and after some thinking we decided to go there by car, all three of us. :D

Chibicon was held on 14th October at Pohjankartano in Oulu. This year's theme was horror and it was visible when you looked at what people were wearing – I saw someone dressed in an It inspired clown costume, to name one. I've also been an It clown, but that was at work.

Chibicon info booklet.
Because of how sudden the decision to go to Chibicon was I went there as a filthy casual, meaning I had no cosplay on. :'D I don't regret it though, the weather was not the best and I'm still not 100% snotfree from the flu I ran into a while ago...

The Chibicon morning was pretty chaotic, not gonna lie. I had been told that we would leave for Oulu 9 in the morning, Swedish time. I was at my mom's place and made sure to be ready by then but it soon turned out that Carina was late and it turned out that the reason was that Sabine was impossible to get out of bed – in fact she was still sleeping way past the decided time, lol. So le boss came to pick me up first and then we drove back to her apartment and I went to wake Sabine up; she wasn't too happy because she had a great dream or something. x) Oh well, we got into the car and started driving to Oulu.
We accidentally drove past Oulu first but we got to Chibicon in one piece, albeit late. I must mention that during the car trip I played Pokémon Go and when we got to Oulu city I screamed in the car because I found my second shiny Magikarp as my first ever Pokémon in Oulu, what's the fucking odds?! Fun fact: I've caught 96 Magikarps in the game and got two shinies, insaaaaaaaaaaaaane. ::DD

Golden paper ticket. Se ei oo kullattu vaan kullitettu.
My boss was the sweetest and paid for my con ticket (she paid for her daughter as well), which cost 10 € at the door. ;A; I must admit that I was disappointed to see that it was paper tickets since I collect con tickets and the paper ones die fast and don't have the same collecting value, lol. Oh well, at least it was a fancy shining gold color.

Generic con photo of the building.
I felt dumb when I realized in the car that I had forgotten my powerbank in my other bag and thus I couldn't explore the nearby area in Pokémon Go. In the end it was no big deal because I was busy looking after Sabine and helping her with her purchases etc – she was way too shy/afraid/awkward to pay for her own stuff herself in the sense of handing out the money to the seller, so I did that for her. I didn't mind helping her though, I totally understand why she felt that way and I've been similar for many years ago too. She also can't speak Finnish so the language barrier probably had a role as well. ^^" I had to act as a translator because I was the only one of us three who could speak Finnish, hehe.
It was amazing to see her loosen up and become braver and more self-confident as the day went on. I think visiting Chibicon was that first push that she needed to open up – she even started to plan cosplays for Skecon and that's amazing considering how she said in the car, mere hours before, how she could never wear a costume outside her home because people would see her. I'm really happy I could help her gain confidence and find a community that she feels included in. ♥ Now she's excited for Skecon and that was the point because there she'll be able to communicate with other Swedes and hopefully make friends and memories for life – all thanks to Chibicon serving as the first step towards a new world.
I know this sounds cheesy as fuck but it makes me genuinely happy to help out a fellow person who's had a tough life. I see parts of my former self in her and it's kind of a realization of how far I've come on my own journey ever since I started with this hobby – how much I've grown as a person thanks to it, in other words.

Main area seen from above. Urumi's shop visible.
Main area seen from above.
The first thing we did after getting our tickets was to check out the merchandise. This time it was only Urumi (as far as I could see, excluding the tables from other cons) and for me, as a con veteran by now, it was a bit disappointing that there weren't more sellers in such a big open area. Sabine of course was super excited and bought a lot of stuff – oh how I remember my first cons when I was like that. xD Nowadays I hardly buy anything unless I really want/need it.

Urumi's shop seen from the entrance.
It was nice to see Digimon merch!
Pokémon plushes you'll always find.
Not sure what all of these were but way too expensive imo. xD
Of course the Ginga Densetsu Weed plushes were there!
I was STOKED to find Monster Hunter merch that was not figurines!!
The Artist's Alley was located in the main hall as well, close to the windows. I was surprised when we were at this one table with a lot of canine art etc and my boss started asking me "is that silver?" and at first I was like "silver what?" and after a while I realized she must have meant Silver Fang, aka the name that Ginga Nagareboshi Gin went under in Sweden. She said that she had seen it for many many years ago and had the series on old VHS tapes – I was more than surprised! So yeah, it totally turned out that my boss is secretly a Ginga fan. xD I wouldn't have guessed and it was funny because she told me how she used to cry a lot when watching the series and it had somehow stuck to her – she didn't remember the names but remembered what Gin and Riki looked like, so when we found keychains at the Artist's table she had to have "the son and the father". Awww!

I sadly don't know the artist but it was from this table.
I saw a really nice Thranduil bookmark from another artist but I didn't buy it, mainly because I'm so lazy reading books nowadays, although I want to change that. 

I forgot to take photos but there was a rhythm game room and a video game room of course, along with panels and a cosplay competition. The rhythm game room was in high use and seemed nice but I must admit that I was not impressed by the video game room, sadly – the tables in the room were more than half empty and I think I only saw like 4-5 consoles of which all seemed to be from the newer generations. I personally only stay in the gaming rooms when there's retro consoles available (Nintendo 64 and older) because that's what I want to play the most because I lack the really old stuff at home. Of course it's nice that there's the newer generation consoles too but yeah, I'm an old-school kid at heart. x)

I don't have so much to say about Chibicon itself. There wasn't really much to do nor see for the old stager who's already seen a lot of conventions but it's still, of course, a nice quick trip away from your everyday life. ^^ Chibicon is your usual small con in the north so yeah, slope all expectations and just go in with the intention to have a relaxing geeky day and you'll be happy. It's slow-paced and fun and there's no pressure. Definitely go there with friends!

Oh and yeah, it was a bit weird to realize that the last time I was at Chibicon was back in 2013. Time sure flies by fast... 

No idea if this was even related to the con but
it gave me a good laugh. xD
I guess that's about all that I had to say. It was a fun and different con trip for me and I'm really grateful to my boss for driving us there and for the company, it wouldn't have been possible otherwise! I'm looking forward to go with Sabine to more conventions in the future ~

October 12, 2017

Lens review: Angelic Eye Mesmerize Blue

Hello people!

Long time no see, as you might have noticed. ^^" Truth is that during last month I moved to a new apartment (I finally have enough space to live in!) and that of course meant that I was incredibly busy with moving, paperwork etc. Things have started to settle down now but another big and equally real reason for my blog's silence is the fact that I do not have a reasonably working internet at home yet. You see, the plan was that I would share my cellphone internet to my computers etc but that didn't work out as planned since it turned out that my phone network is horribly shitty (borderline non-existant) indoors so yeah, I have to get a separate home internet for that which sucks because it means extra expenses, lol. Until I get the internet issue sorted out please understand that my blog(s) will be more inactive than usual but hey, I do still post on Instagram and Twitter!

Today's post will be a circle lens review that I should have done ages ago but, honestly, I kept waiting for the sun to show up (for best quality photos) but gave up after weeks of no golden globe in the sky. It felt like mission impossible. I've been so long without sunlight now that I barely remember what it looks and feels like, lmao. Here comes the Angelic Eye Mesmerize Blue review, nonetheless!


Base curve: 8.6 mm
Diameter: 14.5 mm
Water content: 45%
Life span: 1 year (I recommend 6 months)


As far as I know this brand might be exclusive to HoneyColor because I haven't seen them anywhere else, just so you know where to get these lenses if you fancy them. :) I must admit that I solely bought these for the mesmerizing design, like the name implies, hehe. I'm not gonna lie though – I had really high expectations for these lenses and in the end I guess I got a bit disappointed? I don't know.

One lens in. Notice color and size.
I have naturally light blue-gray eyes and normally any blue lenses look good on me, this pair included. The effect it does is pretty and kind of crystal-ish but I feel like, at the same time, it's not as sparkly and eye-catchingly bishounen as I hoped, lol. It could also be the incredibly dull weather outdoors numbing them down but it's hard to say. :/ I still feel like I expected more of a pop in color and a dreamy effect but got a big semi-natural lens instead – don't get me wrong though, I still like it and it's a beautiful lens on its own but it's just that it fell a bit short of what I personally hoped for. I must admit that I'm a fan of bright and colorful lenses, so when a gorgeous design isn't as vibrant as I want it to be I get disappointed. xD

Lens photos ahead!
All photos taken by me during an October afternoon with a cloudy sky.
There's no color filters or such on the close-up photos and that's so that the colors would be as true to real life as possible.


Bathroom light.
Flash photo.
Indoors with the lamp on.
Indoors with only natural room light.
Indoors facing a wall, with window light in my back.
Facing a window (not sun side), weird blue light effect.
Facing a window (sun side), really cloudy sky.
These lenses are definitely big and the color appears a soft medium blue on my eyes a scratching in my butt tells me that the effect of these lenses might be more striking on darker eyes, maybe? Nevertheless it's a good fashion lens and suitable for dolly looks; I would say that this is one of those circle lenses that might work better for fashion than for cosplay – unless, of course, you want to go for a more natural color look; it could be good for more realistic video game characters and such. Sadly the color doesn't show up very clearly when viewed from a distance, hence why my first recommendation is for alternative fashion styles. It's a neat lens and thumbs up for the 'halo effect'!

Regarding comfort I'm not impressed. I managed to wear these for 2 hours and they then felt incredibly dry and I had to take them out! I do have really dry eyes naturally and the expiry date of the lenses was close by the time I took them out of their vials (I had almost forgotten to open them) so yeah, my comfort grade might not be the most accurate because of that. Had I opened them earlier they might have been more comfortable but one can't know. ^^" They aren't scratchy nor blurry but just dry out fast for me.

Distance photo! 


Curious about Angelic Eye Mesmerize lenses but in other colors?
Check out this review: Green

Short summary:

Color: 6/10
Soft semi-natural blue color. It's nice but it sadly doesn't show up much from a distance.
Design: 7/10
Pretty and mesmerizing crystal-like design that leaves a 'halo effect'.
Opacity: 5/10
Shows up as blue but because of the design there's quite a lot of transparency.
Enlargement: 7/10
Suitable for dolly eyes. Big size.
Comfort: 4/10
My grade is probably not fair because I only got to wear/open these when they were close to expiring but yeah, 2 hours at most on my dry eyes.
Naturalness: 6/10
Ignore the size and it's actually pretty okay for a natural lens! The color is toned down and the design's transparency makes it work.

Thanks for reading! I hope you enjoyed this review even though it's way late, haha.

September 3, 2017

MH4U Eldaora's Taus Hunting Horn cosplay prop [part 5]

Hello costumers and hunters alike!

Here comes the fifth part of my bigass Monster Hunter cosplay project – I'm making a Hunting Horn called Eldaora's Taus from Monster Hunter 4 Ultimate. I've been a dedicated fan of the game series since I touched Freedom Unite and now I'm finally making one of my cosplay dreams come true – a MonHun costume!  
I am for now just doing the weapon but I will make an armor set later, to go with this build. 
No idea what I've done before this? :D No worries, the previous parts of this project can be found here: 1, 2, 3, 4

Note: this project is split into several parts because otherwise it would turn into a kilometer post; I need to document my progress carefully (many photos etc) since it's a school project.

Let's go, yo-ho!

Added filler to the face.
So, remember that little tube of filler that stepdad brought when I ran out of the original filler that I was using? I used it up in like 30 minutes. xD He then came with a 3 kilo bucket on the following day and, honestly, I've used up half of it as well just trying to cover up this thing. I don't want to think about it but I've probably used like 5 kilos worth of filler on this project by now...

Doing the whole filler covering is really tedious and time-consuming. I mean, every time I add filler somewhere I have to wait for it to dry before I can rotate this thing, on the floor, to get to the opposite side. The more filler there is the longer it takes to dry (thicker layers dry slowly) and yeah, this part of the process has taken up a lot of time.
The last parts that I added filler to was all the spots that were hard to reach – like all the deep and narrow splits separating the "hair bananas" on the back mane, for example. Once that was done I left it to dry for some days.

Around mid-May I returned to mom's to work on this project. Next up was to sand the whole thing to make it smoother. It's not super visible on the photos how uneven it was after the filler but below is a close-up on which you can really see the uneven and textured surface.

Head before sanding.
So what do I do? I bring out all the sand papers and get to work, of course! It needs to be mentioned that so far I've done all of the work inside the garage, but for the sanding process I carried the Hunting Horn outside and put it on a working table. Mainly to make cleaning easier afterwards and the weather was nice.

No one can say that there's not enough sand papers.
Okay, I'm not gonna lie I had somehow underestimated how much time sanding actually takes. Like I've done it a lot in my life but still I had not counted it into my plans and it was just this "nah, it'll just take a couple hours tops and then I can move on to the next thing". Oh, so wrong I was. xD 
So yeah, even just the rough sanding (60 grit sand paper) took 6+ hours. Guess if I was sick and tired of sanding after a while? I was. It was really tedious and I just wanted to get it done so that I could get forward since, at this point, I was really stressed about potential deadlines.

Rough sanding done.
Anyone want to snort the table? ::DD
I didn't actually do any sanding with finer grit papers since it felt like it would be impossible to get it perfectly smooth and even anyway... especially something of this size. There's a myriad of spots where the foam still peeks through and the foam has all these small air bubbles etc and it's just never gonna be a perfect porcelain finish, lol. Anyone who has worked with expanding foam knows what kind of texture it has – it just felt like a lot of time and work just to make it "a little less uneven", if that makes sense. Also, a lot of the filler was unevenly applied as well, meaning that even after sanding the surface random holes and level differences kept appearing, making the surface bumpy and lively. It's really hard to explain but it's this thing that when you apply an amount of filler to a surface and let it dry, it will show its undermost "layers" (in the exact same position they originally hardened in) once you sand through the outer layers.

Oh well, at this point I just decided that screw perfection and let's go for a more realistic and battle-worn appearance instead. I mean, in the Monster Hunter games any weapon would be made from slain monster materials: fangs, claws, scales, shells, wing webbings and the list goes on. Oh and yes, slain monsters, meaning that a hunter or a group of them has been beating the poor monster to death with various weapons ranging from Great Swords to Hammers and Bows. :D So yeah, with that logic the monster parts used, most likely, were far from in pristine condition and came with whatever bumps, dents and cuts that the hunters inflicted during the hunt...
The Eldaora's Taus is made from materials from the (rusted) Kushala Daora, a powerful Elder Dragon with metal skin and wind-controlling abilities. Hence why I'm gonna paint this thing a metallic silver later on and add rusted accents, just like in the references and in the game.

Eldaora's Taus reference from a MonHun art book.
As you can see in the art book it looks different from the game (I don't own the art book, a fellow MonHun fan sent this to me online!) and because I had no access to the art book I based my representation of the weapon on the in-game model and took multiple artistic liberties to make my life easier while making it. As I've mentioned in earlier progress posts it's thus not 100% accurate and that's a choice I made during the process to save my sanity.

Okay so, back to the sanding. I didn't even bother to sand it perfectly even and there are small imperfections everywhere. At this point I just don't have an infinite amount of time left on this project and thus I decided to just make it more realistic instead, as mentioned above.
But yeah, after all that tedious sanding there was a shitlot of white filler dust everywhere and yes, in every single hard-to-reach crevice on the damn Horn. Good thing stepdad has this special cousin to the common vaccuum cleaner that is just right for the task!

Hello my best friend!
I carefully vaccuumed all over the Hunting Horn, every nook and every cranny, to get rid off as much loose dust as possible. This took quite some time. Before I even started vaccuuming it I could slap the Horn anywhere and these huge white clouds of dust would just explode out of it and float everywhere. xD There was a lot of dust, seriously. My working clothes were all white from it...
Oh and yeah, all that white dust left on the table? I threw it out in the backyard and hey, over at my Instagram you can see how I made some unintentional art with it!

I noticed a not-so-fun thing soon after. :( You see, because both filler and PU-foam are kinda soft and porous materials they get dented easily. I noticed during the sanding that these weird dent lines had appeared at the shaft and I wondered where they had come from – turned out it was from the pressure of the shaft hanging off the table's edge and being pressed down from the weight of the Hunting Horn's main body, against the table.

Red arrows pointing at the dents formed from the table's edge.
Those dents pictured above were actually some of the smaller ones. There was this approximately 15 cm long deep dent on one of the "hair bananas" as well. I was not happy when I saw it. Oh well, no can do but to go back to the filler stage and cover up the dents.

New filler added on marked areas (there were more) to cover
up dents and holes in the foam.
I left it to dry over a couple days and when I came back I sanded it down, to make it look like nothing had happened to it. At this point I also started thinking that if it already takes notable surface damage from minor pressure etc then God knows how much damage it would suffer when taken to a full day at an anime convention! 
My grinding gears were grinding, fast – I had to figure out what to do to make it more tolerant to outer impacts; I needed to make its surface harder. I mean seriously, nothing would suck more than doing all that intricate painting work and then have the whole thing dented or chip off because of the surface below the paint not being strong enough. It would be so frustrating!

My first thought was to cover it in worbla but then I realized that it would need a lot of worbla sheets and worbla is expensive. I then remembered reading some expanding foam prop tutorials on which it was recommended to cover the surface of the foam with papier-maché, probably the most known way to do it but honestly, I don't really like working with papier-maché and would rather avoid it, if possible (it's so messy and tedious). :/ Besides, it would be incredibly time-consuming to cover a build of this size and especially considering that papier-maché requires several layers. I just don't have the time nor patience for that right now and so I looked around for other solutions. I even considered Plasti-Dip (never used it before) but scrapped that idea because I read somewhere that it doesn't really add hardness.

Another problem that made this whole coating issue a bit more troublesome was the fact that the Hunting Horn is already really heavy for a cosplay prop, probably weighing in at anywhere between 10-20 kg for the moment – not gonna lie, it's easily my heaviest prop to date. I'm bad at guessing weight but it's definitely heavy enough to be impossible to lift with one arm and it's even harder to carry since the weight is not balanced at the center but at the main bulk of the body, meaning the head area. So yeah, in other words I ain't gonna easily be swinging this thing around by holding it at the shaft, not even with both arms.
In other words I must try to keep the weight down as much as possible, which also limits my choices; no one wants to carry around a heavy-ass prop for a whole day at a convention. I've honestly been thinking about the weight all along during this process (hence my material choices) but even with that in mind the extreme size and unbalanced bulk of the prop takes its toll along the way. I'm sure there would have been lighter and more convenient options on how to build this thing but this is all a big learning experience for me and my first big and challenging prop in this caliber.

So yeah, I ruled out worbla and Plasti-Dip. I also didn't want to invest in any of the resins nor fiber glass because I lack the know-how and don't feel comfortable getting into toxic materials yet. Stepdad pulled a blank when I asked him (much to my surprise) and so, after thinking and searching, I figured that my cheapest and easiest choice would probably be to just go ghetto and use the old glue-and-water trick. It's probably not the most effective option out there but I've used it before to seal/harden stuff like craft foam and it has done its job decently enough to get a pass and it shouldn't be one of those materials that dissolves the PU-foam either.

On early September I returned to try the glue trick. Stepdad suggested not diluting the glue to avoid it getting too runny and thus not very effective. I decided to heed his advice, it's worth a try to see if it's possible to just directly brush the glue on and have it harden nicely without making the surface all streaky and ugly.

First layer of glue hardened on the shaft. Notice the shine!
I used normal white glue that you can find in most stores. The brand I used is Eri Keeper (Finnish brand) but any PVA-based glue should work. To my relief the glue seems to work decently – it doesn't turn rock-hard or anything but it clearly stiffens up the surface a bit, while still keeping the elasticity, and gives it a nice shiny coating (no visible brush streaks!) as well. I'll need to do a couple or so layers but it works and that's the main point.

One thick layer of glue added.
I ran out of glue before I got done with the front (this thing just ate it up!) and thus took a break from gluing and went to finally do some more progress on the protruding parts – the horns and ears.
My original plan was to cover these in expanding foam and carve them out but yeah, the more I thought about it the more I felt like there had to be a better option. I had previously made the base shape for the horns and ears out of wire net.
After some thinking I remembered that I have two big rolls of black worbla, a thermoplastic used by cosplayers, lying around in the storage; I ordered them some years ago from Germany and have barely used them. The drawback with worbla is that it's so expensive and I haven't used it much, so this will be my first time using worbla for covering some more complicated shapes. I've only done really simple stuff with it before. ^^"
I needed to cover the horns and ears in something to make the worbla have some sort of surface to stick to, especially since the wire net has holes all over it and well, when the worbla gets heated up it gets soft and malleable and would probably just sink through the holes... or something.

#grillivartaat :DD
Budget thinking led me to use extra-strong aluminium foil; it should be able to stand the warm worbla being applied on top and also provide enough support. I just basically wrapped the foil tightly around each shape and then just carefully pressed it down into a snug fit. I kept the foil together (the horns are made of several pieces of foil) by adding some masking tape to cover seams, edges and the like.
I'll get to the worbla part the next time – now I want to get the base treatment over first so that I can get to painting and attaching the protruding parts. So yeah, with the glue gone my work stood still. Stepdad suddenly remembered that he had some kind of leftover glue-ish filler lying around somewhere and went to fetch it – the plan was to experiment and see if it could do the same thing that the glue did, namely harden the surface.

Renovation filler.
I'm sorry I don't have a photo of what it actually looked like but it was similar to normal filler, except perhaps a bit more gooey. It's like filler mixed with glue (some sort of wallpaper adhesive?) so we thought that maybe, if we mixed it with water to get the consistency more liquidish, it could work. We did a test spot and left it to dry but once I came back it didn't seem to have done much of a difference. :( It mainly just darkened up the spot we applied it to and I didn't really notice a difference on the surface's texture. We decided to go back to the glue method, although I think this might have worked if we had used less water but oh well, the glue is safer. I'm sure I'll get some use for this glue-filler later for other projects, heheh.

I feel like this post is getting a bit too long right now so I'll just split it here and yeah, keep your eyes peeled for part 6!