Showing posts with label headband. Show all posts

October 20, 2015

Samurai Deeper Kyo's Hotaru cosplay progress part.1

What's up everyone?

I've started working on my next cosplay – Hotaru from Samurai Deeper Kyo!
I've been wanting to cosplay him ever since I first read the manga back in mid-late 2012. He's just such an awesome character so that, even after all these years, my cosplay wants didn't fade a single bit. SDK is one of my favorite shounen mangas and I wish that more people knew and cosplayed from it...

Now that I'm back in school and I got to continue my sewing classes I decided that it was finally time to make this cosplay into reality!
To start I went to check what fabrics mom had available on the 5th September. I don't want to buy fabrics if mom has usable ones in the attic because hey, free fabrics! o/


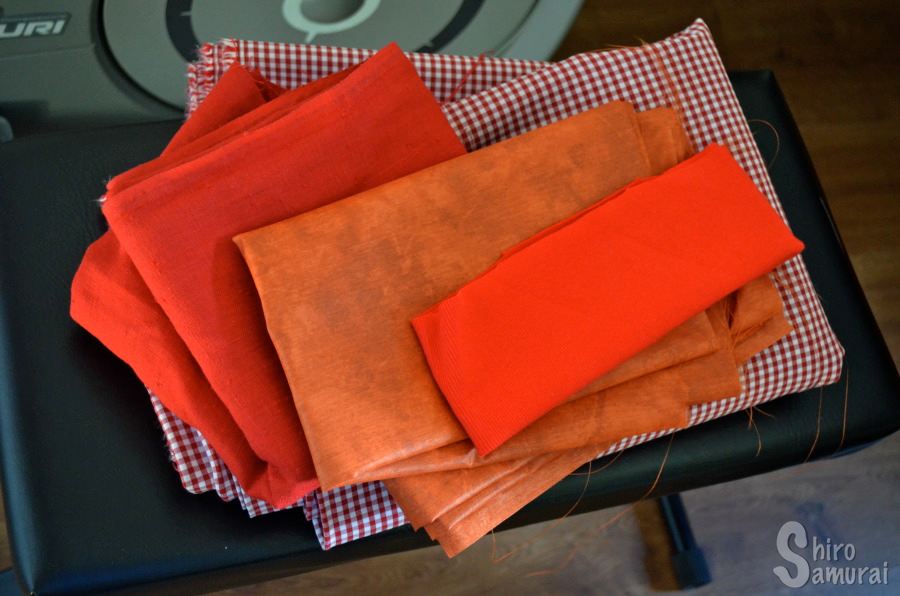
This time I was lucky! I found all the fabrics I needed, save for white cotton for the main kimono's body. This means that the only fabric I will actually need to go buy is the white fabric – and probably some fabric paint. 

Most cosplayers that I see online cosplay Hotaru with red pants and red collars on his white kimono. Personally I always viewed these parts as some middle-ground between orange and red. I honestly think that it looks a bit boring/bland when it's all only red (even his inner shirt is red) – I wanted to have a bit more variation, aka color. Because of this I decided to use a flaming reddish orange fabric for his pants and collars and besides, on some official art these parts do have an orange touch to them.. so I don't think that I'm being horribly inaccurate either. Huhuhu ~

SDK Hotaru reference.
So yeah, I started out by making his headband. Super easy; I just took some red rib knit fabric, folded the width in half and sewed it together.

After that it was time for the inner shirt. I used red linen for it. Actually the whole cosplay I made in school, during my handicraft classes, because why the hell not?
I decided to make the shirt as a sleeveless very loose-fitting top. I wanted it to kinda "hang" in the front (because that's how I always imagined it) so we cut the front pattern's upper part into pieces and spread it out for extra width.

I apologize for the crummy cellphone-quality photos ahead; I didn't have my SLR camera with me in school during this project. Most photos show the colors reaaaaally wrong.

Shirt pattern making going on.
I first did a mock-up prototype out of some scrap fabric to check if the shirt's front worked it did. I then cut out the front and back piece out of the linen fabric. After I had cut out the pieces I used the school's overlock machine to sew around all the edges (same purpose as zigzaging) and well, after that you don't use the overlock anymore. This is seemingly the professional/right way to do it, according to my teacher who has studied sewing in some proper school...

All the edges "zigzaged" with overlock.
Gotta love this thing, everything looks so neat!
With that done I sewed the shoulder and side seams closed, easy peasy. After that I noticed that because I had used a non-matching thread for the overlock the beige threads would show in the arm openings so, err, I had to hide that somehow. if you wonder why I simply didn't change for red overlock threads then that's because school's thread color choices are super limited... 
So yeah, I made some extra curved pieces (from my very last scrap pieces – talk about no fabric waste!) to sew onto the arm openings to hide the overlock seams. I have no idea what the proper name is for these. OTL

Sewing on the... things... whatever-they're-called.
I used the iron to get them to stay in place, aka on the shirt's inside. I put a wet rag on top of the spot that I wanted to iron and I then pinned the "flap" in place so that the seam would, after being ironed, be set on the inside. The iron I set to max heat (because linen) and then I just pressed it on the fabric and let it be still until the sizzling sound of the water/steam faded. After that was done I sewed them down at the shoulder and side seams (nowhere else, only two attachment points) so that they wouldn't flop over on the showing side and look ugly. I sewed exactly on top of the existing seams (on the right side) so that the seams holding the "curved arm pieces" would be close to invisible.

Ironed.
With that done I only had left to finish the hem and the collar. Nothing weird here – I just folded the edges in twice and sewed a straight stitch all around and then it was done.

Next up were the pants. My teacher didn't even bother to use a pattern for it, so I just scribbled some measures down and then she drew directly on the fabric and just cut the shit out. I'm not too sure how good of an idea this was because later on a lot of things ended up being different lengths; too long, too short, too narrow, not aligned etc.
Once again I started by using the overlock machine and sewing all around the edges on all pieces. Then, naturally, I sewed the crotch/butt seams. Next I put the side seams together and that's when I tried the pants on for the first time – just to notice that they barely went past my ass. It still worked but it was way too tight for comfort... and the meh part was that I had zero leftover fabric!
The pant legs were way too long – they were full length when they were supposed to only reach slightly below my knees. D: So yeah, I cut off like 30 cm from both legs and then, to get more width to the waist, I had to use the scrap fabric I had just gotten from the too-long-legs.

Pant legs shortened. (one piece spread out and put to the top)
I just cut up the side seams I had just done, to save time. I then cut the scrap pieces from the legs into triangles and sewed them to the sides of the pants.
Next up was sewing the waist; I left a gap so that I could thread the elastic ribbon through when done but oh boy did I rage on this. I basically just folded the top and sewed a straight stitch all around, leaving a hole for the elastic. Little did I know that doing this super simple task proved to be the most frustrating part of the whole pants. xD The fabric seriously was alive; it twisted and turned and made ugly bumps and folds all over and I had to pick up the seam ripper and undo the whole thing. I cursed the pants to the depths of hell lol.

Turned severed pant legs into triangles for extra width...
I had to do tacking stitches and iron the waist to get the fabric to lay still and well, it still managed to move around when sewing. Fuck you, fabric. Oh well, at least it turned out better than on my first run so I didn't rip it up again; it's still rather not-so-pretty on the inside (luckily it doesn't show on the outside) but whatever, no one's gonna see it except me so lolol.

Tacking threads on waist fold...
I hemmed the pant legs no problem and then I just ironed the seams open and my pants were done. Oh, and I had to cut off like 5 cm from each leg earlier because the front and back sides of the legs totally didn't match. >_> It was either cut the legs shorter or have the butt and crotch seams being horrrrrrrribly mismatched. By some miracle the pant legs were still, even after that forced shortening, a suitable length for Hotaru. What the heck man.

I'm not all that super pleased with the pants; I might redo them one beautiful day... if I can be bothered. But they'll suffice for now.

On the next Hotaru costume progress post I'll make both the inner and the outer kimono, the obi and possibly some of the other small details, like his ear decorations. See ya!

June 5, 2015

Touken Ranbu uchiban cosplays, bits & pieces!

Hi there!

I've slowly started gathering stuff for some Touken Ranbu cosplays! Yes, I'm seriously in love with this online game (even though I haven't actually played it yet; blame shitty internet and a crashy laptop for that) and all the gorgeous character designs! There's way too many cool characters that I want to cosplay and so many are totally the style that I tend to gravitate towards when choosing cosplays anyway, agjhdfsjhahkj! ;w; I just... can't... stop... having horrible cosplay cravings towards Touken Ranbu, hnng!

Okay so, I've gone ahead and bought fabric for Mikazuki Munechika's uchiban (casual) outfit, namely for the yellow headband thingy. I've also bought fabric for the tasuki sleeve cord that both Kashuu Kiyomitsu and Yamato no Kami Yasusada have on their uchiban outfits as well. If anyone wonders what a tasuki is for it's to tie up the kimono sleeves so that they aren't in the way.

Fabrics!
I started making the sleeve tying.. well, tie, first. I took no progress photos because it's simple as hell.
I had bought like 26 cm of a 150 cm wide fabric and I cut it in half so that I got two 150 cm long strips. I then just zigzaged the edges, sewed one end of each piece together to get one 3 m long piece. Then I just folded it in half, ironed and sew the whole shebang closed. When done I ironed the whole shit once more so that it wouldn't twist itself like a retarded sausage, which it did before ironing.
The annoying thing was that even though this was a super simple thing to do I had ridiculous problems with the sewing machine I was using in school. I was using the oldest one and well, last time I used it it was kind to me but now... lolnoep. I had the needle breaking once, the thread getting pulled and snapping off in the middle of sewing God knows how many times and that's not even all! When I put the new sewing needle in place it literally just fell off (even though I had screwed it in place) and IT FELL INSIDE THE GODDAMN SEWING MACHINE. Yep, right through that tiny little hole under the presser. I was like "are you kidding me? ._." but nope, there it went and there it stayed! I even tried to lift the whole sewing machine (with the metal part removed, so that all the dust inside stared at me) and shake it, upside down, but the only thing that came out was an older already broken needle. Fudge muffins.

Finished tasuki being worn.
Seen from the back. Mirror photo, it's reversed!
I did cut the tasuki shorter by one meter before I took the photos; I realized when doing a test-run that there was way too much length to it and I couldn't hide it nicely.
I know that on the official art neither Kashuu nor Yamato seems to have a visible knot in the front but hey, that's the only way I know how to tie the tasuki so that's how I rolled. So far I haven't found an official illustration showing what the back looks like so yeah, if the knot is actually in the back on either of them I'll figure out how it's tied and do it that way in the future. :)

Next I made Mikazuki's headband thingy.
Nothing special to say about this quick project either, except that I used fake leather for the emblem (that I stitched on) instead of fabric paint; the main reason for this because I had scrap pieces of fake leather lying around after making Kojirou's tekkou and well, I couldn't find the black fabric paint anywhere (if I even had any) and the school didn't have any either and well, I'm cheap.

Emblem leather cut-outs placed on the fabric, before being sewed on.
Enjoy the cellphone quality! :'D
Annoying thing was when I was done with the whole shit and held it up to look at it. Yep, that's totally when I saw that one damn loose thread was INSIDE THE FINISHED THING; I had somehow missed to brush it off like the rest. Hnggnhejgfdhjhd!!

You see that fucker? ლ(ಠ益ಠ)ლ
Yep, I had "inside problems" this turn around. OTL Sewing needle falling inside the sewing machine and loose thread inside my completed headband, geez...
Oh well, with the help of some mad ninja skills I managed to move the thread to the very edge of the headband so that it disappeared from view. Mad ninja skills include poking a needle through a spot before were I started stitching (to avoid having to undo the sewing) and moving the needle around repeatedly until the thread moved along with it. :'D enjoymyclumsyexplanations.com

Tried it on my head. Excuse my face, I have zero makeup on...
Yep, that's my Mikazuki wig which recently arrived; I just took it straight out of the bag and put it on my head. I will need to style it later – this is just a quickie to see how it fit with the headband.
At one point I was seriously worried that the headband would be too short to actually be possible to tie, but thankfully that wasn't the case. Even with the wig on it's still okay!

Actually my Yamato no Kami Yasusada wig arrived together with the Mikazuki wig and yep, this is totally why I'm actually wearing Yamato's outfit on the Mikazuki headband pic and the other pics. ;)
I did a super quick outfit test (aka zero makeup) to see what it would look like; I already had everything needed for his uchiban outfit now that the wig showed up, woop!

Sorry about my weird expression and that it's a mirror photo, I
was home alone. Enjoy the Wario cap in the background.
I took the wig straight out of the bag and put it on.
The white hair ribbon I have yet to add...
I guess this would count as some kind of closet cosplay because I had the hakama already from earlier cosplays (Kenshin & Hakuouki's Hijikata) and the kimono is from my vintage collection, aka my kimono kitsuke hobby. x) The scarf I stole borrowed from Hasakitsuki. Only the wig I needed to order and well, the tasuki I made. No shit, Sherlock.

Psst, I have a wig for Kashuu as well that arrived recently! I just might need to cut and style it a bit and, of course, add the white hair tie. But I'll save that for another post!

That's all for this time! Bub-bai ~

January 15, 2013

Third time's the charm - Shinsengumi headband

Konnichiwa!

Finally decided to try and finish my shinsengumi headband. The last try didn't work and I learned from my mistakes.. aka do not use stretch fabric.
I went to the attic and looked at other fabric options; I found some semi-glossy black slightly sturdier non-stretch fabric.. I have no idea what it is but it seemed okay so I decided to use it. Not so much to say about the process because it's very basic, I'll let a few photos speak instead.

Fabric cut out (I cut extra for seam allowances)
Zigzaged around
Folded in all the sides and sewed
Sewing it in place on headband
I don't understand why it took me so many tries to get such a simple thing right... troll!headband. OTL Oh well, now it's done and I decided to do a very quick try-on in cosplay to see that it wasn't trolling even after being finished...

Excuse my lack of pretty much all make-up except eyeliner.. I couldn't be bothered. Also mostly mirror photos.


Just to show length of headband
(note: ponytail is under it on this)
It seems to be working all right, thank God for that. I was getting fed up with this project. I think I'll use the headband for Hijikata at Närcon Vinter, possibly the other shinsengumi guys in the future too.

Hmm, not so much more to say. I'm really looking forward to Närcon Vinter!

January 4, 2013

Shinsengumi headband modification + stuff

Hi everyone.

I went to town today on the morning together with Jäätynyt Enkeli. First thing we did was that we went to his study apartment and ordered the train tickets for Närcon Vinter. Yay finally it's out of the way... sadly we couldn't get the Närcon discount herpderp. Oh well, after that we walked to the post office and I picked up the black ponytail clip-on I had ordered from eBay a month ago. It sure took its time to get here. ._. Better late than never... it was from China but still, never taken this long before for anything I've ordered to arrive.. except that one wig that got lost lol, I got a replacement wig though free of charge.
I must say that when I got the package in my hand I was... weirded out. My first thought was "is this now the right thing I ordered? It can't possibly fit into this... ó_ò" and then I started imagining all possible more or less bad scenarios. xD Oh well, I put it in my bag and went back inside the shopping center (post office is on the outside of the same building). When inside I remembered I needed to buy some cosplay make-up, namely some good concealer/foundation/whatever-stuff-to-cover-derpness-on-your-face (I'm soooo knowledgeable when it comes to make-up terms.. lolnope) because yeah, powder alone just doesn't really cut it and the one thing I have is just... well.. it takes forever to dry and doesn't fit my skin tone - first I look like Simpsons and then I look like I have airdried poo on my face.
So I wobbled into the make-up specialized store like "herpaderp I know like almost nothing about this shit -and I wouldn't put my foot in here unless my nerdy hobby called for it- but I need some stuff that gives me this effect herpaderp". Yeah, go figure. Luckily I got some guidance to some kinda promising concealer which I decided to give a try.. but the price wasn't as yummy: 25 €. My poor wallet cried tears of blood. *pats it* I'm happy I only use make-up for cosplays...  


When I got home I took out the package. It's sooo tiny!

package in size comparison with normal (bigger) scissors...
... but sure there was my ponytail clip-on in there!
It was tightly rolled inside. I must say I was surprised. XD I took it out and it unrolled like WROOM and I was all "mistä tämä pituus oikein tulee? : DD" no ei Saunalahdesta ainakaan. Highly space effective way of packaging lol.

Now over to the progress part. You might or might not remember that I did a shinsengumi headband quite some time ago. Yeah, I never wore it to a con because I noticed it derped. It was a bit too wide to wear on your forehead with a wig. It would look derp.. or at least on my face it did. Also the craft foam protector part thingy creased when bent and the glue didn't hold it super securely in place. So I've been thinking about modifying it for a long time and today it was time for it to finally get a long awaited make-over.

First things first. Rip off the craft foam part.
It left some glue remains.. not sure if gusta.
I then took the seam ripper and unstitched the whole thing open again. I didn't want to cut any fabric because who knows, I might need the extra fabric someday later if I want to resize the width again.
When I had unstitched the whole thing I wondered what to make the forehead protector part out of; I wanted something that was glossy and would bend with the fabric... and so my mind went to the roll of pvc fabric my mom has. "Why not?" I thought and went ahead to try. Oh boy little did I know what hell awaited me...

After cutting out a fitting piece of pvc fabric
I went to iron the headband itself, this time folding in the sides twice to get it thinner and after I just resewed it shut again.

Double folded and ironed sides before sewing.
Sewn shut.
And now to attach the pvc piece to the middle. I just thought that it would be easy peasy to sew on. The first few stitches went all good and I was positive it would work so I continued sewing. I noticed very soon that every second stitch I had to lift the presser foot because the fabric wanted to turn to the side and crease and fold up under the presser and ahgjfdskjadskgj. But I continued sewing... and when I was almost done with the upper part I finally noticed that the whole thing had turned into a fucking drunk banana crooked beyond all points of hope!!

"Tell me again how you were supposed to be a headband..."
(yes, that's the default form it took if I tried to lay it flat, go figure)
I raged silently for myself and here comes the seam ripper. But sweet Jesus! Dx The stitches were so small it was impossible to rip them up because the seam ripper's.. rip.. point.. thing.. seemed gigantic in comparison. OTL So I tugged the pvc fabric upwards and somehow, slowly, managed to unstitch it. But the hand position I had to keep hurt like fuck and it felt like my thumb muscles or something would disintegrate when I was done. Needless to say my feelings were nothing less than..


If you didn't figure it out already - I left it unfinished.
Maybe another day I'll finish that sucker up... now it can just go and... sew itself goddammit.

June 12, 2012

Fixed the last details for my shinsengumi outfits

 Hi guys!

I've been packing most of the day and I hope I don't forget anything now. I wonder where I've put my hair tie for Saitou... I've done some cosplay progress too: I added the long ties for the shinsengumi haori today and made the headband.

It's ready ~ <3
I just cut two 2 meter pieces of some random white cord that we had lying at home and tied them to the loops inside the haori, then I test tied it to see about how far down the ties fell on my back.

reference for haori himo length (and headband too..)
Turned out 2 meters was waaaay too long so I cut around 50 cm or something off each end and kept tying them together until I got them to look about right.

Next (and last) thing to do was the shinsengumi headband.
I had yesterday bought two strips of around 12 cm of thin bed sheet-ish flowy fabric (whole fabric width) and I started from that. First thing to do was sew one of the ends together so I got one long piece. Then I zigzaged around the whole thing and next up was to iron it. After ironing it in the middle I put it on my head to see how long it was. Too long. Again. So I cut 40 cm off both ends.

After I had cut off excess length. lol why do I look so angry?...
Then I folded and ironed the sides...
... and sewed it closed ~
And when that was done I went and grabbed my bag of craft foam. Yes, I'm cheap. XD I took the brown sheet because, well, brown is better than yellow or green or something. lol
I cut out a 21 cm long (whole width of the sheet) and a 5 cm wide piece and proceeded to mix together some glue and water in a glass bottle. I needed to seal the craft foam because craft foam is kinda like a sponge and it sucks up paint like a monster otherwise. Or something.

Craft foam sealing preparations
I coated it around 4 layers and then I got lazy and picked up the silver spray paint and went outside. Several coats of paint later I let the piece dry and then I used some Karlssons klister (it glues everything pretty much) and glued it to the headband. I tried to sew it on at first but it derped so I resorted to using glue. I let it dry again and tried it on ~

Finished headband
Closer shot of it
When it's not on my head trolol
I'm not 100% sure what color it's actually supposed to be because the pictures I looked at showed different colors... ._. Oh well, I made mine silver and if I later find out it's the wrong color I can always make a new one, not much trouble. Now I did some quick version because, as you all know, I'm leaving tomorrow. I will use the haori and headband for both Saitou and Hijikata and also other future shinsengumi members I will cosplay. That means now both my Saitou and Hijikata cosplays are finished and con ready, YAY! ~

Bye bye!