Hello and greetings to you!
I've been working on and off the past weeks on a sort of undershirt for Masamune because even though it's not really obviously visible if he has something under that torso armor plate or not.. I can't imagine it being terribly comfortable if there wasn't anything under it hahah.
I have not written about this earlier even though I did not make it all in one day.. I decided to write everything in a single post when it's done, which it now is.
So I warn you now, a lot of ramblings and progress photos ahead. If anyone wonders why I take so much progress photos of the steps when I work on my Masamune cosplay it's because it's a big "project work" I have to do (yes, I chose to do a costume) and therefore I need to show how I work and document all progress so my supervisor can follow what I do and blah blah.
The first progress on this undershirt I made on the 6th January. I decided to use very dark blue tricot fabric because it was what was easily available and I figured that because Masamune's undershirt isn't shown it wouldn't really matter what color it was (and besides it would hardly be seen anyway) ... but I wanted either black, dark gray or dark blue.
I found some close enough pattern
(or not, it was some kind of top.. I don't know really) and decided to use it. I fixed the fabric and pinned the pattern in place. It was a bit short so I lengthened it a bit too. Also I cut the sides straight instead of curved.
 |
| Pattern pinned on fabric |
The pattern I used didn't originally have a sleeve pattern but mom told me she had used this pattern quite a lot and found that another pattern's sleeve pattern fit it. I went and searched for it and then I found it. I didn't need the "mouth" of the sleeves as wide so I skipped the seam allowances except at the shoulder attachment part.
 |
| Sleeve pattern pinned on fabric |
Because I've never sewn a long-armed shirt before I wasn't sure how the sleeve would fit.. yes, I found that upper shape weird. So to reassure myself I went and wrapped it around my arm after I had cut it out. At the same time I also decided to mark with a pin how far down I wanted the chainmail net fabric to reach.
 |
| Sweet Jesus, it indeed will become a sleeve! :DD lolololo |
Next thing was to cut out the net fabric for the sleeves. It would be on top of the sleeves, like a second skin. First I just put it on top of the fabric to see what it would look like when finished.
 |
| Net fabric on top of sleeve. (pin marks how far I want it to reach) |
 |
| Close-up photo |
It looked surprisingly good so I decided to go ahead and cut out fitting parts. I folded the net fabric and put the cut out sleeve on top, to act as a pattern. As you can see on the photo below the full sleeve is not on the net fabric, I only wanted the net fabric to reach to that pin placed horizontally... the uncovered parts of the sleeve would be hidden by Masamune's gauntlets anyway.
 |
| Reference photo. As you can see the gauntlets reach pretty high, something elbow length.. |
 |
| Net fabric cut out to right shape and pinned in place |
After I had all the parts cut out for the sleeves I started sewing the undershirt's shoulders closed, right sides facing each other as usual. I used an overlock machine.
 |
| Sewing shoulder seams.. |
That was all the progress I did on 6th January. Next progress was on
11th January.
I started by zigzaging the net fabric in place at where it ends on the sleeve, some 5 or so centimeters before the sleeve's "mouth".
 |
Net fabric zigzaged in place..
(I chose to zigzag because it felt more secure than just a straight stitch) |
After that was done I could go ahead and sew the sleeves to the undershirt... lolnope. Mom told me I had forgot to mark which part of that sleeve curve attachment thing is front and which is back. It was not like I had forgotten.. it was more like I had
no idea long-armed shirt sleeves were so fancy that it mattered which way you sewed them on to the shirt itself. OTL
(note: I've never sewn a long-sleeved shirt.. or heck, any sleeved shirt before.. just kimonos and a sleeveless shirt)
So I went and grabbed the sleeve pattern and put it beside until I could figure out which way it was supposed to be sewn on.. luckily the pattern was marked.
 |
| Notice "Etu", it means front in Finnish |
 |
| Looking at the left sides of pattern and sleeve you'll notice it curves slightly deeper.. |
Okay, so that side which curves more will be sewn to the shirt's front. I went and got the body of the undershirt and pinned the sleeve in place.
 |
| Sleeve pinned in place |
 |
| Sleeve attached to the body of the undershirt |
Next step was to sew the sleeve closed as well as the sides of the undershirt. Still using an overlock machine.
 |
| Started sewing the sleeve closed |
 |
| One sleeve sewn, about to sew armpit and go over to sewing the shirt's sides closed... |
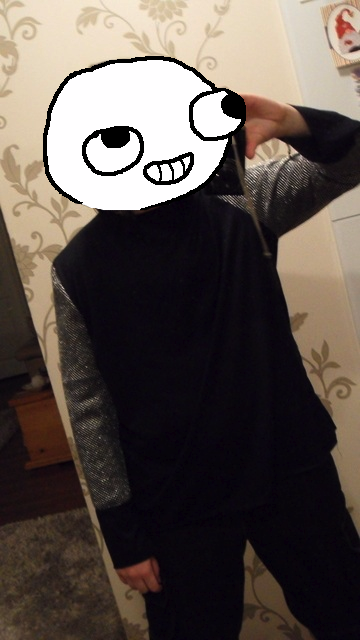
After both sleeves and both sides of the shirt were closed I could put it on and it would resemble clothing, yay. I put it on and it seemed okay so far.. but what was not okay was my face, hence the face censor.
 |
| Excuse me very dark photo.. |
That was all the progress I did on 11th January. Next progress was on
14th January.
With the sleeves sewn on and the sides closed I had the hemming and collar left to fix. I decided to hem the shirt's bottom first... but it was uneven.
I used the overlock to cut it straight and sew the edges so they don't fray. Then I switched over to the "normal sewing machine" and hemmed the bottom with a straight stitch.
 |
Hemming hemming ~
(alien camera color anyone?) |
Next up was to hem the "mouth" of the sleeves. I had to take off a part of the sewing machine so I could fit the sleeve around that part on which the presser is. I didn't want to risk accidentally sewing the sleeve opening shut.
 |
| Zigzaging the opening of the sleeve.. |
 |
| .. and hemming it with a straight stitch |
That was all the progress I did on 14th January. Next progress was on
22nd January.
What was now left was the collar. I had pretty much no clue how to make a collar so what I did was pretty much impromptu. I started by taking a measuring tape and measuring around the collar on the undershirt to figure out how long the collar needed to be to fit. Then I went to get some white fabric that had some stretch in it but still wasn't overly.. floppy. Found a fitting fabric at home.
Because I couldn't find the fabric pen I had to use pins instead to mark the fabric where I would cut. I thought a 10 cm wide collar would be enough. I added some extra length just in case.
 |
| Fabric marked with pins |
 |
Collar fabric cut out
(I cut off those.. err.. sides of the fabric with those small holes.. you know, which keep the fabric from fraying.. I have no idea what they are called) |
I figured I would need some light interfacing fabric for the collar...
 |
| Went to get the roll of interfacing fabric, put collar half on it... |
 |
| ... and cut out two fitting pieces |
I ironed on the interfacing fabric to the wrong side of the collar pieces. I cut off the excess. I then went to sew the collar pieces together at one end to form a single long piece.
But when I thought about how to attach it things got weird; it wouldn't really work. I would need to sew the other ends together too so I would get one closed
donut collar...
 |
| Like this. Now it looks like it could work... |
Buuuuuuuttttttt. At this point I realized I had made a measurement mistake, d'oh! Of course I would have to fold the collar in half because there's the interfacing fabric on the wrong side... and because of this I should have cut the collar twice the width I wanted it to be when finished.
 |
| Collar folded in half, now only 5 cm wide... |
I thought it wasn't too bad of a mistake so I continued. I took the undershirt and test pinned the collar around the collar opening of the shirt. The collar was way too long...
 |
| Notice the huge collar bump/gap.. ill-fitting... |
I had to cut off a few centimeters from one of the ends I had sewed together and resew it closed.
 |
| After I had cut one end open again for a better fit |
After resewing it closed I test pinned it in place again. This time it fit much better, not perfectly but better. Also I noticed if I aligned one of the shoulder seams with the corresponding collar seam the seams at the other side would not match up.
 |
| Better fit but both sides can't have aligned seams... |
But I think I know why that is - because the undershirt's collar opening
on the front and back are not of the same size while the collar has
exactly the same length between each seam.
I can't win haha.
I just decided to go with it and went to the overlock machine to sew the collar on.
 |
| Sewing collar on |
I had to stretch the shirt's fabric a bit to get the collar to fit around right because it was still a bit longer than the shirt's collar opening.
(both of them stretches lengthwise)
When I was done I noticed the collar is more.. err.. bigger, than when I put the shirt on without a collar. Probably because of the fabric stretching during the sewing.
 |
| Finished undershirt |
I don't mind so much even though the collar isn't super accurate for the character; when it is looser and isn't hugging my neck I don't have to worry about restricted neck movement or face derps. I know my face tends to look bad when I have a high collar.. so I guess this kind of went from an unwanted cosplay mistake to an unplanned adjustment for a more flattering fit for the wearer, hahaha.
This sums up my feeling about this "fail" perfectly:
Oh, and during the collar progress, which I did today, I was in fact wearing kimono. I had worn kimono before deciding to sew and I didn't feel like changing clothes sooooo... as a final
BONUS PIC here's my sewing outfit of today:
 |
Yes, that's a measurement tape and yes, I tied my sleeves so they wouldn't be in the way ~
(mirror photo, I'm not dead...) |
That's it. Next time I think I'll start on Masamune's coat for realz.. or at least that's the plan, hah!


The undershirt looks great man! Lots of work, but it sounds like it was a good, new experience for you. Plus I'm really glad the collar mistake turned out to be a good thing in the end! Man, I swear that net fabric is just so ingenious. :D It seriously looks like actual chain-mail over the undershirt! ~
ReplyDeleteOh yes, a most excellent choice of sewing outfit, I must say!
Thank you!
DeleteI'm happy how well that net fabric idea worked out.. I was afraid it would look overly fake/cheap but nope, it's pretty cool. :)
Hahaha thanks! :D