Arr me mateys!
Yeah I know, I have a lot of unfinished cosplays lying around and yes, I'm starting a new one. Thing is that as I study sewing and fashion I have to do various garments in school and why not incorporate cosplay into it? :D
So my task was to make a shirt – normally this should have been like a collared, standard buttoned shirt but that's boring as fuck so I decided to make a 1700s pirate shirt instead. More exactly the shirt that Edward Kenway wears on his Whaler Outfit (it's an alternate outfit in the game) in Assassin's Creed IV: Black Flag. I gotta admit that I haven't been able to find a single cosplay of this particular outfit and so I suspect I might be the first one to do this. *puts on hipster frames*
This post is long and photo-heavy as it covers the whole shirt WIP from start to finish.
Now I had to do a lot of research into historical fashion before attempting this project and while I'm obviously not making anything 100% accurately hell no I ain't handsewing everything lol because then I'd have to omit all the pattern making parts and that would basically disqualify me from using the school project for the creation of this cosplay lmao. Also, I spent a good amount of time staring at Edward in the game and a bunch of details that should, historically speaking, be on his clothes were not there (sleeve gussets etc) so I don't feel too bad with selectively choosing methods lol.
The hard part with this outfit is that I was unable to find any kind of concept art or such and thus my only references are literally from the game, and that makes things a bit hard as there's no way to, well, undress Edward. xD Most of the shirt is hidden because of that brown vest and all the weapons piled on top, but thankfully I found a
video on Youtube where someone had managed to pull off what I assume is a glitch to get Edward unarmed (it shouldn't be possible) to get a slightly better view on the outfit and yes, this video was helpful for me because when I paused at a few super specific frames I could see the lacing on the front which is normally hidden by the guns.
 |
| Rough model reference. |
So the first thing I did was to figure out what I'm actually making, so I scrambled together a rough draft of the shirt model and some details about what it looks like. Those seams on the upper half of the sleeves were hella confusing for both me and my teacher for the longest time – what are they??
I had plowed through historical fashion articles online for hours and not found any mention nor example of what those seams were for and not a single photo of a recreated nor intact survived garment had those. So I came to the conclusion that it's got to be some Assassin's Creed bullshit that just looks cool. xD But more about this later!
I ordered a fabric swatch through the school from this one big
wholesale online store in Finland. I originally wanted a full linen fabric but settled for a cotton and linen blend as it was what was available and might be a bit easier for maintenance. Maybe.
 |
| Test fabric swatch! It was literally perfect. Just what I hoped for! |
So I ordered like 5 meters of the stuff and played the waiting game. I don't remember what the price was but it was a lot cheaper than I thought, that's for sure. Meanwhile I waited I started working on the patterns, and because this was done in school I couldn't just take a close-enough ready pattern and modify it – I had to make it from scratch.
I'm unsure what it's called in English but whenever you start sewing any piece of clothing you have to make a "peruskaava" (literally translates to something like 'basic pattern') of your own measurements that you then modify to look like the model of the intended garment.
 |
| Drafting of the basic pattern before any modifications. |
Before doing this pattern in natural (aka big) size I had to do a miniature twice to learn how to do it, first with the measures of a "perfect model" for practice and then with my own measures. I hate doing patterns oh my god. Drafting patterns is by far my least favorite aspect of sewing and my weak point. I'm horrible at math so that's probably one of the reasons why...
 |
| My fabric arrived! |
Around a week or so later my fabric arrived. I was still in the middle of finishing my patterns so I let it be for a few days while I was busy modifying the base pattern to look like Edward's shirt. Modifications included for example widening and straightening the whole thing including sleeves, changing the neckline, lowering armholes, lengthening it and adding slits to the sides for easier movement. Can't be a stiff assassin!
 |
| Pattern modification in progress, aka "kuosittelu" in Finnish. |
On the photo above you can see what modifications I did and how. The sleeve is the one furthest away. I basically cut every piece (front, back and sleeve) in two parts to add width in the middle, this is to keep the rest of the dimensions from being screwed up.
 |
| Made a prototype from the modified patterns. |
As soon as I had finished modifying the patterns I cut out the pieces from a cheap cotton fabric to do a test mockup. Wouldn't want to cut straight into the real fabric and notice that something's horribly wrong... :)
Meanwhile I did that I had also crammed the whole real fabric into a washing mashine to shrink it. It didn't come pre-shrunk and because we're in a proper learning environment (höhö) we actually have to bother with this part.
I have sinned and gotta admit, I never did it at home. It honestly feels pretty bad when you pop in your whole bunch of fabric and then watch it magically shrink and become wrinkly and you sit there and think "I paid good money for this fabric that just literally disappeared". xD It's kind of a bummer but something you have to deal with and yeah, because this was a cotton and linen blend it shrunk a lot. Oof.
 |
| Shrunk fabric drying. #wrinklyforlife |
Well, at least it's gonna look worn with those forevermore wrinkles lol. I tried to iron them away but they just wouldn't go. I kinda don't even mind, in fact I was considering throwing in a tennis ball to make the fabric look naturally weathered. But I didn't.
 |
| Mockup test wear, sleeve poof edition. |
Once the mockup was deemed good I cut into the real fabric. I decided early on that I wanted to eliminate visible seams as much as possible, especially finishes like zigzag. This made me decide on doing French seams (aka bag seam or reversed seam) on most of the construction. It makes progress a tiny bit slower than normal but it's worth it.
 |
| Always start by sewing the shoulder seams together. |
For every seam that I did I pressed them open to get a cleaner finish and make the next step easier. I'm pretty sure I had done a mistake on that photo above and had to rip it up because yeah, when you do French seams you have to put wrong sides together instead of the usual right sides together. xD It messed with my head the first few times until I got a hang of it, lol.
And now we get to the part I told you about. Namely those weird-ass seams on the sleeves.
 |
| Snapped this screenshot from the game, for reference. |
What is their purpose?? I was dumbfounded, I don't even know what I'm looking at. My original guess was that it's some sort of supporting seam to alleviate strain or something as Edward is a working man (I mean he was a moderately poor farmer's son before he became a privateer-turned-pirate) and the outfit in question
is called whaler outfit. But when I googled like 18th century whalers I found nothing about their worn clothes and, if I did, it looked nothing like what Edward wears. So my next plan of action was searching for what sailors and pirates wore during that time period and even there I found no such mention about a sleeve seam like that.
So after getting no historically based results I rounded it up to being artistic liberty from the game makers and decided that I can create it however the fuck I want, as long as it looks the part. I mean, there is some room for different interpretations but I ultimately settled to make it not a seam but like a decorational band that runs on top of the sleeve.
 |
| Placement testing. |
So I cut out these strips of the same fabric, around 5 cm wide, and folded in the edges. I test-pinned them on top of the sleeves to find the correct position. This took some testing with me running back and forth into the fitting room and pinning myself with needles. I eventually found a placement that looked reasonable and was at the same assumed height as Edward's, except on my body.
 |
| I baste stitched the strip in place to keep it from moving while sewing. |
It's a bit hard to explain how I did this part as I wanted to avoid visible seams on the strips save for the one in the middle that separates the soon-to-be-added "fillings". So I had folded in the edges, after zigzaging them of course, and I intentionally ironed them so that one side was slightly longer than the other so that there would be a slight overlap. I then baste stitched one of the ends to the bodice of the sleeve by hand, to keep it from moving, while I then sewed a straight stitch just at the fold line.
 |
| Like this. |
Rinse and repeat for the second sleeve. One tiny lil' problem though, I had to get the same curvature on the second sleeve as I had on the first. Luckily there's a solution to everything.
 |
| Life hack! Pin trails to the rescue. |
With the sleeves sewn up to the same point I had to start wondering about what to use as "filling", if anything. My original idea was to just keep the strips flat but the more I thought about it, the more boring it felt. I wanted to add some dimension to it, make it stand out a bit – make it a bit more 3D I guess. I figured I'd try with some leftover cord the school had lying around.
 |
| This was my method of pulling the cord through. |
It gave some additional thickness albeit not a lot. And there wasn't enough of that cord for both my sleeves anyway so it only worked for a test and yeah, for the real deal I needed to find something else. I quickly remembered that mom has a ton of cords in different colors and so I sent a text message and asked if we happened to have one in this natural white color. Turns out we did so she would bring it some days later.
Also, on the photo above you can see that I had done the middle, separating seam to turn the strip into two "tunnels". The thing I mentioned earlier about the edges overlapping is also the reason why, once I did the middle seam, the strip was actually secured because the overlap got caught under the seam and thus attached. It's hard to explain but on the cross-sectional views I made (it's at the end of this post) it is easy to make out what I mean. ^^"
Meanwhile I waited for the cord I worked on the neckline instead. I basically just added the facing. Nothing special here, I just ironed on some light interfacing, cut notches to make it fold over nicely and yada yada.
 |
| Facing added. |
One thing I did do slightly differently was doing that one uniting (err idk what to call it) seam on the facing's side so that when you turn it over there's, once again, no visible seam on the front.
 |
| This kinda shows what I mean. |
Soon enough my cord arrived, the whole roll of it. I wriggled the cord through the passage once again with the method shown above, which basically means I attached the cord's end to some thread and the thread I tied to a safety pin which I then pushed through the tunnel using my hands. This method was not fool-proof though as the thread did end up breaking once or twice because it got stuck and I pushed too hard, forcing me to start over.
 |
| Umm... not what I had expected but okay? |
Once I had the cord inserted I noticed that it somehow pushed the other side of the strip up towards the sky. It looked really wonky and even more so when I tried it on. I had not accounted for that but thankfully it was a pretty easy fix.
 |
| Hand-sewing! These stitches only show if you look from above. |
I hand-sewed the upper side of the strip down, to keep it from protruding, by sewing sneakily on the underside. This method once again saved me from a visible seam. Of course I did this after having inserted the cord into both sides.
 |
| Cleaned up model drawing. |
With those weird sleeve things out of the way I could finally focus on the cuffs. Now everyone knows that 18th century shirts often had poofy, ruffled sleeves gathered at the wrists. And Edward kinda does too. But the thing is that back then elastics weren't invented so I couldn't just do the easy "add an elastic and call it a day" approach but had to make it the, well, proper way.
I stared at my references and figured that the tightening systems have to be on the underside of the sleeve. My only option was to use some kind of cord, leather strings or such but before I decided on that I had to create the passage for the thing to pass through. This was very easy, I once again made a strip of some leftover fabric I had, zigzaged the edges and just simply sewed them on at the edges. Now I of course got visible seams but that's pretty much unavoidable and on the game model there definitely is a seam or two going on there anyway.
 |
| Placement prepping for the sleeve gatherers. |
My original plan was to use leather strings for the job because it would feel rather authentic. I will return to this later because there's a reason I say "original plan", haha.
 |
| Yep, I really wanted to use leather at first. |
So with those passages done I started to actually attach the sleeves to the bodice. I don't remember exactly what happened here but there was something with the sleeve being too big in regards to the armhole, I think. Whatever it was I had to lower the armhole to make up for the difference before I could attach them together and make it look reasonable and not like a dumpster fire just unleashed.
 |
| Modifying on the spot. I cut off that curve you see sticking out from the bodice. |
Next up was sewing the sleeves closed and continuing all the way down the sides. Of course I left the lower ends unsewn because I would add slits later.
At this point I ran into the single most frustrating part of the whole project in terms of sewing, namely that those weirdass upper sleeve things were being annoying little bastards having the cord ends peeking out when I tried to sew that side seam closed. >_> You see, I intentionally left a little bit of extra length for each cord that I inserted, so that they would not disappear into the passage while I was putting glue on the edges to keep them from unravelling. Yeah, because the cord was cotton I couldn't simply just burn them to seal the edges. So this extra length wasn't much but it was more than enough to cause trouble once I got to that point while I was attempting to close the side seams. The thing is that I needed to tuck the cords away from the path of the stitching and this was extra hard to keep track off because, once again, I only did French seams.
 |
I almost got it but then this lil' son-of-a-bitch
poked his head out and I had to undo. ;_; |
I had to redo the same sleeve at least three times because the "tucking allowance" was so minimal and there was almost no room for any error, aka slippage of the cord. Even harder it was because the French seam had to keep a specific, consistent sewing distance (to not exceed the seam allowances) and it was a battle of like a literal millimeter or two to keep the cords from not poking out. I'd be lying if I said no perkeles escaped my lips. :))
 |
| Test fitting once I finally got the sides closed. |
I could see the end, I was almost done! Now I only had to finish the slits and add the lacing to the neckline and I could call it mission complete. But it wasn't that easy as I had to do a quick test again on cheap cotton fabric to be able to wrap my head around how the heck you make a slit while you also have a French seam. And my teacher wasn't any wiser either so a test it was. xD
 |
| This was the test conclusion on how it should be done. |
Once you could visualize what you had to do it wasn't nearly as much of a headache as it first seemed. In fact it was quite easy – you just cut into the French seam at the intended beginning point of the slit and then fold the edges accordingly to the sides.
 |
| And here's the slit on my actual shirt. |
But because I cut into the fabric I created raw edges where there weren't any before, and this meant that I had to secure these somehow. Using the sewing machine wasn't really an option because it was such a small area and those folded edges were already sewn in place, which meant that once again I had to hand-stitch. To get the best finish and most security I did buttonhole stitches.
Sadly I noticed at this point that the
leather strings for the sleeve gathers I worked at earlier did just not work as smoothly as I
had envisioned. The leather kinda got
stuck (likely due to the surface texture causing friction) and it felt
like it would snap if I applied force. It should be noted though that
these leather strings were old ones my teacher had originally bought for
some jewelry projects that she forgot about, possibly like 30 years
ago. xD So that might be a reason why lolol.
So
with not much else to choose from I went back to the trusty cord my mom
had brought me. At least I don't suffer from bad conscience because the
cord is actually full cotton and not polyester, which is the norm lol.
 |
| Omfg it works! :DD |
I
changed the leather strings for the cords and went to do another test
fitting. Gotta admit that I was nervous, would it work? I pulled the
ends and the sleeve gathered sooooo much smoother, bingo! The difference
was pretty whack, using the cords it just slid through with little
effort and felt really solid. Only thing is that I will need an extra
pair of hands to help me tie the cord ends together every time I wear
the costume out. xD It's stupidly hard to do yourself lmao.
With that done I only had the lacing left to do I had already hemmed the sleeve edges and the bottom of the shirt previously. I wanted to do the holes for the strings to run through without damaging the fabric and so I decided on using an older method, the same one used for Finnish folk costumes (or that's what my teacher said). So to start with I of course had to mark out where the holes would be. By watching that video earlier I could make out that there's at least four guaranteed holes and that's what I decided to go by as I wanted it to look simple.
 |
| Holes marking and one hole in progress. |
You see that huge metallic thing on the photo above? It basically looks like an oversized hand-sewing needle and that's the specialty tool I used. It forces a hole into the fabric without breaking or damaging any fibers. After I got a hole I had to enlarge it somehow and for that I used those orange scissor things in the back of the photo; I basically pressed the blades closed, so that they wouldn't cut anything, and used the scissors as a sort of drill to carefully dig the hole bigger. I repeated the process for all four holes and, once that was done, I took out the hand-sewing stuff again and buttonhole stitched around the edges super tightly.
I had planned to use the leather strings as the lacing (I wanted some use out of them) but I noticed after pulling them around that they actually colored the fabric! It wasn't the end of the world as a worn look wouldn't actually be bad for this particular costume, but I decided on using something else just to be on the safe side. I was worried if it would bleed during rain, for example.
And then I remembered that shiny cord I had used for the test on those weird sleeve things... and lo' and behold there was enough of it to use for the lacing! But before I decided on using it I wanted to make sure what it was actually made of – you see, I did not want to use any chemical fibers for historical accuracy's sake.
So, umm, I took that bit of cord with me home and did a burn test to determine material. I'm gonna admit that I was expecting it to be chemical so yeah, when I stood in my kitchen with the lighter and lit it on fire I was not prepared for it to flare up and burn so effectively that I had to drop it in water to get it to stop. xD I legit thought I'd start the fire alarm because it smelled awful for the next couple hours (even with the windows open)! When I soon after touched the burnt surface the ash crumbled in my fingers into these tiny tiny particles – it was silk. I could use it.
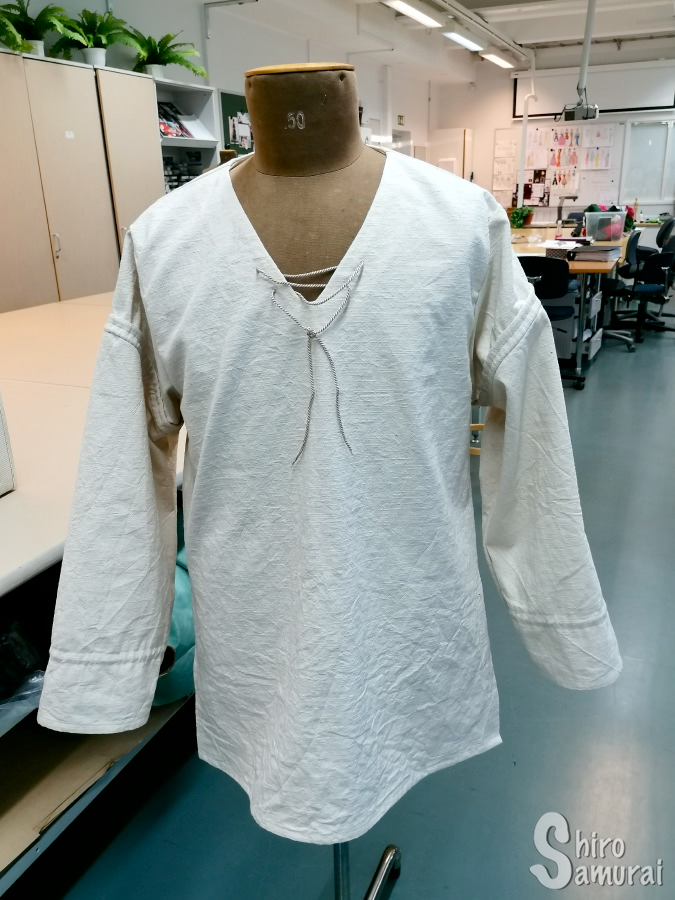
Thanks for reading this far, below's the completed shirt:
 |
| Shirt front. |
 |
| Shirt back/side. |
This was a fun project, somewhat challenging but not too hard. In hindsight I feel like maybe the facing made the neckline look "too clean" but my teacher insisted on that it's a must-have sooo, whatever. *shrugs* I'm not sure how it would look nor behave without facing but Edward's neckline is very sloppy and just rather shapeless, lol. Oh well, I'm not sure if I can remove it later because I am worried that, without the added support of the facing, the holes for the lacing would potentially end up damaging the fabric or some such (the holes go through both lacing and bodice and are hand-stitched together by the holes).
 |
| The product paper, incl. cross-sectional views. |
I have already started work on Edward's pants so that's gonna be what part 2 will be about. Stay safe and have a nice day folks! Thanks for reading.