Oh sweet Jesus, two updates in one day. I sure have been productive today, ohohoh ~
Even
though the 'flap' isn't completely finished yet I decided to tackle the
next task, namely Ichito's hakama-ish pants. Mom was confused at first when I
tried to explain that I needed to make some kind of 'tubes' below the
knees of the pants, so I could tie those feet wrappings on top of them. I
also wanted to make 'tubes' so that the pant cuffs wouldn't ride up all the
time. So err, after some explaining that lead to nowhere I tried to
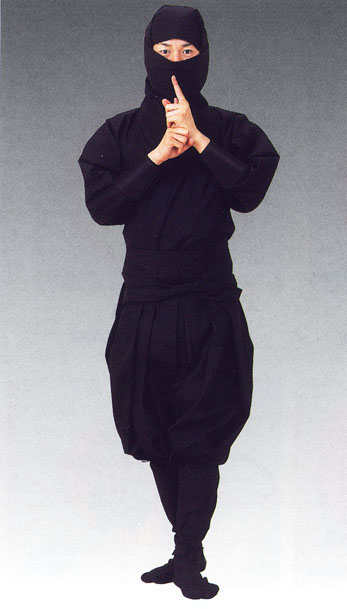
think of what the closest to Ichito's pants was.. and then I found this when googling:
 |
| NINJA PANTS! |
Or well, tattsuke hakama I believe they're also called.
Now she got it. She said I could go buy some long gray socks and sew them on... but that I will get back to later...
I needed to go dig in one of mom's "pattern files" after
the pattern for those wide pants that we had used earlier as a base and
modified to make hakama. I did find it and after some doubts, measuring
and pattern tweaking (to make it smaller) we managed to get the dark
brown fabric to be just enough. I couldn't even take any seam allowances
and the front and back pattern touched each other...
 |
| Fabric just cut out |
Mom cut the fabric for me just before she
left to go visit her mom (Mother's day in Finland today) because, well,
I'm a lefty and sometimes using right-hand scissors gets super hard...
sghjdfghs. Then she left, after giving me some instructions what to do.
So I went and zigzaged around all the four parts. After that I sewed the
two back parts together at the "butt seam" and same thing with the
front. lol And when that was done I started to measure out those hakama side openings...
 |
| Pinning openings |
And then I just sewed around the folded piece. It formed a triangle, like this:
 |
| lololo my camera made the dark brown fabric look blue/violet. WHAT THE HELL.
|
After that my 'ninja pants' had started to
look slightly like... well, pants. So I pinned the front to my t-shirt
and held the back up with my hand. Buuuuuuuuut when I was doing that I
accidentally scratched myself on one of the pins...
 |
| Pins are evil
|
But
I didn't bother to go get a plaster instantly or even do anything to
it, I just went on with what I had been doing before. lol
 |
| (ignore dirty mirror) |
The side seams aren't sewed together, I
just pinned them in place. Mostly just testing what the side openings
looked like and if the front and back pieces were a good enough length
after doing some pinned-to-place pleats. Oh, speaking of pleats. I had
to unstitch and redo the "butt pleats" two (or was it three?) times
before I got it right because the fabric made a fugly horizontal big
wrinkle close to the stitch I had made to keep the pleats in place...
 |
| Finally it looked good... |
 |
| .. but I had to redo the front pleats once too. |
And I know a standard hakama has five
pleats on the front... although, as I mentioned earlier, I was very short
on fabric (yay for free leftover fabric) so I didn't make them as wide
as normally so I just had place to make two pleats. Besides Ichito's
hakama doesn't show any pleats at all and even if he had five those
would be covered by the 'flap'...
 |
| I can see no pleats trololo, just looks like big puffy pants with hakama side openings to me. xD |
Next step was to sew together the side seams.
Dinner was ready but I decided to sew the sides together before I went
to eat. Noticed afterwards it was a bad decision because in that hurry I
made an epic fail and after turning the hakama every way possible I
noticed I had sewn the wrong side seams together... needless to say
there was no way to get into the thing... except the side openings or
the leg holes. OTL
 |
| Oops. I'm so not gonna squeeze into that. lol |
So I had to unstitch the fail side seams on
both sides and do it again.. but this time make sure to attach the
right ones together...
 |
| Ah, that's better ~ |
Then I just sewed the whole "inside/crotch
seam" and then I went and pinned the thing, that now resembles some kind
of mini hakama, to my t-shirt.
 |
| Side shot |
 |
| Front-ish shot |
 |
| Back-ish shot |
And
that's what I got done today. I still need to cut out the ties, gather
the fabric a bit below the knees so it poofs and sew some kind of
'tubes' to it so it keeps in place and so that I can easily wrap those
wrappings over it... oh, and yes, I think I'm gonna skip the koshiita
(back board), it won't be seen anyway because Ichito's hitatare-ish
jacket and 'back flap' will cover my ass anyway. trololo
Lazy man, lazy excuses.
PS. Did anyone notice how much my camera distorted the colors? OTL The last pic is the one closest to the real color.
Byeee ~